jQuery Dropdown Menu

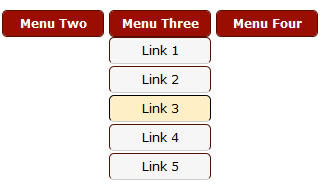
In this post, we are going to create a simple dropdown menu with the help of jQuery, take a look at the demo of it first. I assume you know at least the basics of jQuery and CSS. The key to creating the dropdown menu is to use the CSS’s properties: position, top, left, z-index.
With these properties, we make sure that dropdown menu appears exactly below the hovered link and over any other element. We then make sure that when mouse is over a link, we show the corresponding dropdown menu and when mouse is away, we hide it back. For these events, we use the jQuery’s mouseenter and mouseleave methods. So that’s all we need to know to create the dropdown menu, pretty simple stuff !
HTML
Here is how the html looks like for each of dropdown menu:
<div id="container">

 <!-- First Menu Start -->
  <ul>
  <li><a href="#">Menu One</a></li>

 <li>
  <a href="#">Link 1</a>
  <a href="#">Link 2</a>
  <a href="#">Link 3</a>
  <a href="#">Link 4</a>
  <a href="#">Link 5</a>
  </li>

 </ul>
  <!-- First Menu End -->

 <!-- Second Menu Start -->
  <ul>
  <li><a href="#">Menu Two</a></li>

 <li>
  <a href="#">Link 1</a>
  <a href="#">Link 2</a>
  <a href="#">Link 3</a>
  <a href="#">Link 4</a>
  <a href="#">Link 5</a>
  </li>

 </ul>
  <!-- Second Menu End -->

 <!-- and so on -->

 </div>
As can be seen, we are going to use the unordered lists for our dropdown menu. Each menu link is given a class of dropdown and dropdown itself has been wrapped in a list with class of sublinks. These class names will be utilized by jQuery to decide which menu to show.
CSS
Here is the CSS for the dropdown menu:
/* CSS For Dropdown Menu Start */
  ul
  {
  list-style:none;
  padding:0px;
  margin:0px
  }

ul li
  {
  display:inline;
  float:left;
  }

ul li a
  {
  color:#ffffff;
  background:#990E00;
  margin-right:5px;
  font-weight:bold;
  font-size:12px;
  font-family:verdana;
  text-decoration:none;
  display:block;
  width:100px;
  height:25px;
  line-height:25px;
  text-align:center;
  -webkit-border-radius:5px;
  -moz-border-radius:5px;
  border: 1px solid #560E00;
  }

ul li a:hover
  {
  color:#cccccc;
  background:#560E00;
  font-weight:bold;
  text-decoration:none;
  display:block;
  width:100px;
  text-align:center;
  -webkit-border-radius:5px;
  -moz-border-radius:5px;
  border: 1px solid #000000;
  }

ul li.sublinks a
  {
  color:#000000;
  background:#f6f6f6;
  border-bottom:1px solid #cccccc;
  font-weight:normal;
  text-decoration:none;
  display:block;
  width:100px;
  text-align:center;
  margin-top:2px;
  }

ul li.sublinks a:hover
  {
  color:#000000;
  background:#FFEFC6;
  font-weight:normal;
  text-decoration:none;
  display:block;
  width:100px;
  text-align:center;
  }

ul li.sublinks
  {
  display:none;
  }

/* CSS For Dropdown Menu End */
Most of the CSS is there for styling the menu (although you can style it even better if you want) but here are some of the important things to note in that CSS:
1 - We remove the bullets from lists using list-style:none;
2 - We know that lists are block-level elements and always appear vertically. In order to make it appear horizontally, we make them inline elements and float them to left with:
display:inline;
float:left;
3 - The links by default are inline elements, we make them block-level elements with display:block; so that we could apply a width to them.
4 - Initially we hide all dropdown menus with:
ul li.sublinks
{
display:none;
}
jQuery
Imagine the old days, creating the dropdown menu with raw javascript, well a lot of code ! but this is all we need with jQuery:
$(function(){
  $('.dropdown').mouseenter(function(){
  $('.sublinks').stop(false, true).hide();

 var submenu = $(this).parent().next();

 submenu.css({
  position:'absolute',
  top: $(this).offset().top + $(this).height() + 'px',
  left: $(this).offset().left + 'px',
  zIndex:1000
  });

 submenu.stop().slideDown(300);

 submenu.mouseleave(function(){
  $(this).slideUp(300);
  });
  });
  });
Pretty easy stuff there actually, let me explain how. First and as usual, we wrap our code in jQuery’s ready handler:
$(function(){
...
});
We run our code when mouse enters (mouseenter method) an element with class set to dropdown ($('.dropdown')), the menu link in our case:
$(function(){
$('.dropdown').mouseenter(function(){
........
});
});
We make sure that we hide (hide()) all previously open dropdowns when mouse enters a menu link:
$('.sublinks').stop(false, true).hide();
Note the stop function there, it helps us to show only one dropdown at a time when mouse is quickly hovered over various menu links. If we did not use it, each dropdown menu will remain visible unless we move our mouse arrow away explicitly. That is basically known as queue buildup so we avoid that with stop function there.
We then grab the actual dropdown menu to be shown with and store in into a variable:
var submenu = $(this).parent().next();
If you look at the html:
<!-- First Menu Start -->
  <ul>
  <li><a href="#">Menu One</a></li>

 <li>
  <a href="#">Link 1</a>
  <a href="#">Link 2</a>
  <a href="#">Link 3</a>
  <a href="#">Link 4</a>
  <a href="#">Link 5</a>
  </li>

</ul>
  <!-- First Menu End -->
When a link with class dropdown is hovered, we move back with parent() ending at <li> and then with next(), we reach at our desired dropdown menu, <li> with class sublinks. So this is basically how jQuery makes it easy for us to find which dropdown to show when a particular menu link is hovered upon.
After that, we apply some CSS to the dropdown so that it appears exactly below the hovered menu link:
submenu.css({
position:'absolute',
top: $(this).offset().top + $(this).height() + 'px',
left: $(this).offset().left + 'px',
zIndex:1000
});
That code is very important as it makes sure that dropdown appears exactly below the hovered menu link. With position set to absolute, we can position the element at any place on the document independently. We then get the top position of the hovered menu link with $(this).offset().top (this refers to current hovered menu link) and add to it the height of it so that dropdown appears exactly below that link. We do something similar for the left property. We then use the z-index property to make sure that dropdown appears over everything else.
And then we show the dropdown while sliding it down with slideDown at the speed of 300 millseconds with:
submenu.stop().slideDown(300);
Of course, you could have used other methods of animation such as fadeIn, animate with custom animation styles.
Now this far it was about to show the dropdown. It is time to hide it when the mouse leaves it. We do so with this piece of code:
submenu.mouseleave(function(){
$(this).slideUp(300);
});
To hide the dropdown, we use slideUp, the opposite of slideDown. Note that submenu is a variable we had created earlier to denote the dropdown.
So that was all there is to creating a single-level dropdown menu with jQuery.
You might also like
Tags
accordion accordion menu animation navigation animation navigation menu carousel checkbox inputs css3 css3 menu css3 navigation date picker dialog drag drop drop down menu drop down navigation menu elastic navigation form form validation gallery glide navigation horizontal navigation menu hover effect image gallery image hover image lightbox image scroller image slideshow multi-level navigation menus rating select dependent select list slide image slider menu stylish form table tabs text effect text scroller tooltips tree menu vertical navigation menu

 Subscribe
 Follow Us
 14 years ago
 7788
7788 1994
1994


