JQuery Navigation

You should now be set to create your HTML file. Open up dreamweaver and start a new HTML document, save the document straight away as index.html on your desktop. Open up notepad and save a blank file as styles.css. Also save this on your desktop. Download the latest jquery libary from the jquery website, save the file inside a folder called “js”. Open up the folder and rename the file to just “jquery.js”. In the code view of dreamweaver link your style sheet and jquery file.
html
<link href="styles.css" rel="stylesheet" type="text/css" />
<script type="text/javascript" src="js/jquery.js"></script>
Begin laying out the foundations of our HTML file, the HTML file will consist of a content wrapping div or container, a simple header div with a heading tag inside and then our navigation.
<div id="content_wrap"><!–content wrap begins here–>

<div id="header">
<h1>JQuery Navigation Bar</h1>
</div>

<div id="navigation"><!–navigation starts here–>
<ul class="nav_links">
<li><a href="#">Page #1</a></li>
<li class="withdiv"><a href="#">Page #2</a></li>
<li class="withdiv"><a href="#">Page #3</a></li>
<li class="withdiv"><a href="#">Page #4</a></li>
<li class="withdiv"><a href="#">Page #5</a></li>
<li class="withdiv"><a href="#">Page #6</a></li>
<li class="withdiv"><a href="#">Page #7</a></li>
<li class="withdiv"><a href="#">Page #8</a></li>
</ul>
</div><!–navigation ends here–>

</div><!–content wrap ends here–>
Right lets add our CSS styling to our divs etc… The first thing we need to style will be our body and container.
css
*{
padding:0;
margin:0;
}

body {
background-image: url(images/bg.png);
background-repeat: repeat-x;
background-color: #ebebeb;
font-family: Arial, Helvetica, sans-serif;
font-size: 12px;
color: #5f5f5f;
}

#content_wrap {
margin: auto;
width: 850px;
margin-top: 0;
margin-right: auto;
margin-left: auto;
}
Pretty much straight forward stuff, the content_wrap is our container, this will just center our little website. The next bit of code will be for our quick and easy header we just basically want a box with some text in it, this will also aid in postioning the navigation.
h1 {
color: #FF0000;
text-align: center;
margin-top: 25px;
}

#header {
float: left;
height: 94px;
width: 850px;
}
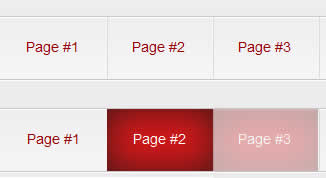
Notice the size of our header div, its the same height as our 1st rectangle in which we created in photoshop. Now for the navigation styles.
#navigation {
float: left;
height: 62px;
width: 850px;
}

.nav_links ul {
margin: 0px;
padding: 0px;
}

.nav_links li {
list-style:none;
display:block;
font-size: 14px;
float: left;
}

.nav_links a {
text-decoration: none;
color: #990000;
display: block;
height: 40px;
padding-top: 22px;
padding-right: 27px;
padding-left: 26px;
}

.nav_links a:hover {
color: #FFFFFF;
background-image: url(images/hover.png);
background-repeat: no-repeat;
}

.withdiv {
background-image: url(images/divider.png);
background-repeat: no-repeat;
}
Now for the jquery part, open up a blank notepad document then save it as custom.js into your JS folder. Open up your custom.JS file in dreamweaver then paste in this code.
$(function() {
// OPACITY OF BUTTON SET TO 100%
$(".nav_links a").css("opacity","1.0");

// ON MOUSE OVER
$(".nav_links a").hover(function () {

// SET OPACITY TO 30%
$(this).stop().animate({
opacity: 0.3
}, "slow");
},

// ON MOUSE OUT
function () {

// SET OPACITY BACK TO 100%
$(this).stop().animate({
opacity: 1.0
}, "slow");
});
});
The code is similar to the fade in fade out code, only this time theres a few extra lines which stops the animation. In the frst couple of lines you’l notice it calls the class “.nav_links a” this is basically what your applying the fade effect too. You could change them to something eles say an image and it will fade the image. Theres just one more thing to do before we test it out and thats link our other .JS file, we should have two in there already, just add another line for the custom.js file.
<link href="styles.css" rel="stylesheet" type="text/css" />
<script type="text/javascript" src="js/jquery.js"></script>
<script type="text/javascript" src="js/custom.js"></script>
You might also like
Tags
accordion accordion menu animation navigation animation navigation menu carousel checkbox inputs css3 css3 menu css3 navigation date picker dialog drag drop drop down menu drop down navigation menu elastic navigation form form validation gallery glide navigation horizontal navigation menu hover effect image gallery image hover image lightbox image scroller image slideshow multi-level navigation menus rating select dependent select list slide image slider menu stylish form table tabs text effect text scroller tooltips tree menu vertical navigation menu

 Subscribe
 Follow Us
 14 years ago
 8199
8199 1798
1798


