CSS3 and jQuery“Stay-On-Top”Menu
 14 years ago
  17614
17614  3209
3209
 n/a
n/a

All the HTML Stuff
Create index.html and paste all of this in:
<!DOCTYPE html PUBLIC "-//W3C//DTD XHTML 1.0 Strict//EN" "http://www.w3.org/TR/xhtml1/DTD/xhtml1-strict.dtd">
<html xmlns="http://www.w3.org/1999/xhtml">
<head>
<title>Create Stay-On-Top Nagging Menu with CSS3 and jQuery</title>
<meta http-equiv="Content-Type" content="text/html; charset=utf-8" />
<link rel="stylesheet" href="style.css" type="text/css" media="screen" />
</head>
<body>
<div id="header"></div>

<div id="navi">
 <div id="menu" class="default">
  <ul>
   <li><a href="#">Home</a></li>
   <li><a href="#">CSS</a></li>
   <li><a href="#">Design</a></li>
   <li><a href="#">Development</a></li>
   <li><a href="#">Freebies</a></li>
   <li><a href="#">Inspiration</a></li>
   <li><a href="#">Resources</a></li>
   <li><a href="#">Tutorials</a></li>
   <li><a href="#">WordPress</a></li>
  </ul>
 </div><!-- close menu -->
</div><!-- close navi -->

<div id="content">
 <p>
 Lorem ipsum dolor sit amet, consectetur adipisicing elit, sed do eiusmod tempor incididunt ut labore et dolore magna aliqua. Ut enim ad minim veniam, quis nostrud exercitation ullamco laboris nisi ut aliquip ex ea commodo consequat. Duis aute irure dolor in reprehenderit in voluptate velit esse cillum dolore eu fugiat nulla pariatur. Excepteur sint occaecat cupidatat non proident, sunt in culpa qui officia deserunt mollit anim id est laborum.
 </p>

 <p>
 Lorem ipsum dolor sit amet, consectetur adipisicing elit, sed do eiusmod tempor incididunt ut labore et dolore magna aliqua. Ut enim ad minim veniam, quis nostrud exercitation ullamco laboris nisi ut aliquip ex ea commodo consequat. Duis aute irure dolor in reprehenderit in voluptate velit esse cillum dolore eu fugiat nulla pariatur. Excepteur sint occaecat cupidatat non proident, sunt in culpa qui officia deserunt mollit anim id est laborum.
 </p>

 <p>
 Lorem ipsum dolor sit amet, consectetur adipisicing elit, sed do eiusmod tempor incididunt ut labore et dolore magna aliqua. Ut enim ad minim veniam, quis nostrud exercitation ullamco laboris nisi ut aliquip ex ea commodo consequat. Duis aute irure dolor in reprehenderit in voluptate velit esse cillum dolore eu fugiat nulla pariatur. Excepteur sint occaecat cupidatat non proident, sunt in culpa qui officia deserunt mollit anim id est laborum.
 </p>
</div><!-- content -->
</body>
</html>
Depending on your screen resolution, you will need a lot of text so…
IMPORTANT: Keep adding paragraphs with “lorem ipsum” until the menu disappears from your sight entirely when you scroll down to the very bottom of the page.
Importing jQuery and Nagging Menu Script
In your index.html file, just before the closing </body> tag, paste those two lines:
<script type="text/javascript" src="http://ajax.googleapis.com/ajax/libs/jquery/1.4.2/jquery.min.js" charset="utf-8"></script>
<script type="text/javascript" src="nagging-menu.js" charset="utf-8"></script>
Let’s Make a CSS Soup
This is just the basic CSS, so create style.css file and paste all of this in:
body {
 background: #efefef;
 margin: 0;
 padding: 0;
 border: none;
 text-align: center;
 font: normal 13px Verdana, sans-serif;
 color: #222;
}

#navi {
 height: 50px;
 margin-top: 50px;
}

#menu {
 line-height: 50px;
 text-align: center;
 margin: 0 auto;
 padding: 0;
}

#content {
 width: 750px;
 margin: 0 auto;
 margin-bottom: 25px;
 padding: 30px 0;
 text-align: left;
}

ul {
 padding: 0;
}

ul li {
 list-style-type: none;
 display: inline;
 margin-right: 15px;
}

ul li a {
 color: #fff;
 text-decoration: none;
 padding: 3px 7px;
}

ul li a:hover {
 background: #01458e;
 color: #ff0;
}

.default {
 width: 850px;
 height: 50px;
}

.fixed {
 position: fixed;
 top: -5px;
 left: 0;
 width: 100%;
}
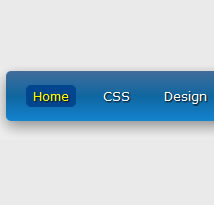
The .default and .fixed classes are very important to us. They will change the look and position of our menu; the former is responsible for how the menu looks at the beginning and for its position in the browser window, the latter is responsible for where the menu goes after we kick it out from its original position and how it looks then.
CSS3 Extravaganza
Now for the fun part :)! Let’s go from the top to the bottom through our CSS soupe and add some CSS3 sugar accordingly:
Step 1: Spicing Up #menu
We’ll add a subtle gradient and rounded corners.
The gradient for browsers based onWebKit engine:
background: -webkit-gradient(linear, left top, left bottom, color-stop(0%, #426d9c), color-stop(40%, #0f67a1), color-stop(100%, #1384d1));
Simple as it is. We’re adding linear gradient, going from the top to the bottom vertically. Our gradient consists of three colors, color-stop simply tells the browser where that particular color should stop and the next one begin.
The gradient for browsers based on Gecko engine:
background: -moz-linear-gradient(top, #426d9c, #0f67a1, #1384d1);
The same as above, only we don’t have to be specific about where each color stops, because it looks great as it is already.
Let’s add rounded corners, first for browsers with WebKit engine:
-webkit-border-radius: 5px;
That’s really self explaining. The syntax for browsers with Gecko engine looks like this:
-moz-border-radius: 5px;
And at last, the proper syntax:
border-radius: 5px;
Your CSS3 styles for #menu should look like this right about now:
#menu {
 background: -webkit-gradient(linear, left top, left bottom, color-stop(0%, #426d9c), color-stop(40%, #0f67a1), color-stop(100%, #1384d1));
 background: -moz-linear-gradient(top, #426d9c, #0f67a1, #1384d1);

 -webkit-border-radius: 5px;
 -moz-border-radius: 5px;
 border-radius: 5px;
}
Step 2: Spicing Up ul li a
Here, let’s add rounded corners, text shadow and some subtle transition. We know the syntax for rounded corners already:
-webkit-border-radius: 5px;
-moz-border-radius: 5px;
border-radius: 5px;
Now, the shadow for our links:
text-shadow: 1px 1px 1px #000;
This will place the shadow 1px to the right and below our link. The shadow will have 1px blur radius and black color.
Now, our smooth transition:
-webkit-transition-property: color, background;
-webkit-transition-duration: 0.5s, 0.5s;
The transition-property determines which properties fall under the transition, in our case it will be color along with background. The transition-duration determines how long the transition should last, it will be 0.5s for color and 0.5s for background accordingly.
Your CSS3 styles for ul li a should look like this:
ul li a {
 text-shadow: 1px 1px 1px #000;

 -webkit-border-radius: 5px;
 -moz-border-radius: 5px;
 border-radius: 5px;

 -webkit-transition-property: color, background;
 -webkit-transition-duration: 0.5s, 0.5s;
}
Step 3: Spicing Up ul li a:hover
Nothing new here, CSS3-wise:
ul li a:hover {
 -webkit-transition-property: color, background;
 -webkit-transition-duration: 0.5s, 0.5s;
}
Step 4: Spicing Up .default
Here we’ll add only box shadow:
-webkit-box-shadow: 0 5px 20px #888;
-moz-box-shadow: 0 5px 20px #888;
box-shadow: 0 5px 20px #888;
Similiar to text-shadow, this will place the shadow 0px to the right and 5px below our menu. The shadow will have 20px blur radius and #888 color.
Step 5: Spicing Up .fixed
The same goes for .fixed, we’ll add only box shadow:
-webkit-box-shadow: 0 0 40px #222;
-moz-box-shadow: 0 0 40px #222;
box-shadow: 0 0 40px #222;
This time it will place the shadow 0px to the right and 0px below our menu, but the shadow will have 40px blur radius and #222 color.
The entire file should look like this right now:
body {
 background: #efefef;
 margin: 0;
 padding: 0;
 border: none;
 text-align: center;
 font: normal 13px Verdana, sans-serif;
 color: #222;
}

#header {
 background: #0F1620 url(bg.jpg) no-repeat top center;
 width: 100%;
 height: 120px;
 border: solid #0F1620;
 border-width: 3px 0 3px 0;
}

#navi {
 height: 50px;
 margin-top: 50px;
}

#menu {
 background: -webkit-gradient(linear, left top, left bottom, color-stop(0%, #426d9c), color-stop(40%, #0f67a1), color-stop(100%, #1384d1));
 background: -moz-linear-gradient(top, #426d9c, #0f67a1, #1384d1);

 -webkit-border-radius: 5px;
 -moz-border-radius: 5px;
 border-radius: 5px;

 line-height: 50px;
 text-align: center;
 margin: 0 auto;
 padding: 0;
}

#content {
 width: 750px;
 margin: 0 auto;
 margin-bottom: 25px;
 padding: 30px 0;
 text-align: left;
}

ul {
 padding: 0;
}

ul li {
 list-style-type: none;
 display: inline;
 margin-right: 15px;
}

ul li a {
 color: #fff;
 text-decoration: none;
 padding: 3px 7px;

 text-shadow: 1px 1px 1px #000;

 -webkit-border-radius: 5px;
 -moz-border-radius: 5px;
 border-radius: 5px;

 -webkit-transition-property: color, background;
 -webkit-transition-duration: 0.5s, 0.5s;
}

ul li a:hover {
 background: #01458e;
 color: #ff0;

 -webkit-transition-property: color, background;
 -webkit-transition-duration: 0.5s, 0.5s;
}

.default {
 width: 850px;
 height: 50px;

 -webkit-box-shadow: 0 5px 20px #888;
 -moz-box-shadow: 0 5px 20px #888;
 box-shadow: 0 5px 20px #888;
}

.fixed {
 position: fixed;
 top: -5px;
 left: 0;
 width: 100%;

 -webkit-box-shadow: 0 0 40px #222;
 -moz-box-shadow: 0 0 40px #222;
 box-shadow: 0 0 40px #222;
}
Great job, we’re done with CSS. Let’s add some jQuery!
jQuery Magic
All our code should be executed after the DOM is loaded. For that we’ll use this great method jQuery has, called .ready(). You’re probably familiar with the long notation:
$(document).ready(function() {

 // all our code will go here

});
But this time let’s use the short notation, which does exactly the same thing:
$(function(){

 // all our code will go here

});
Now, first thing we should do, is to grab our menu (which is a div with ID “menu”) and assign it to a variable, because we’ll use it several times. The same goes for its position, and for that we’ll use jQuery’s .offset() method which, unlike .position() method, returns the position of the element we use it on relatively to the document, not to the offset parent. Let’s do it:
var menu = $('#menu'),
 pos = menu.offset();
Next, we need to listen for the scroll event, so every time we scroll the page up or down something happens:
$(window).scroll(function(){
 // code here
});
Now we need to check if we scrolled down so far that our menu is not visible anymore. This point is exactly the position of our menu from the top + its height. We also need to check if the menu is now in its default position and has the default look:
if($(this).scrollTop() > pos.top+menu.height() && menu.hasClass('default')){
 // code here
}
If the result of our if statement is true – we want the menu to fade out, the we need to remove the .default class, give it a class of .fixed and then fade it back in, so we can see it:
menu.fadeOut('fast', function(){
 $(this).removeClass('default').addClass('fixed').fadeIn('fast');
});
Right now the effect works only in 50%; it fades out when you scroll down and then it reappears at the top of your browser window – but it doesn’t return to its original position and size when you scroll back up. Let’s fix it now.
For this we need another if statement. This one will be the exact opposite of the first one we made, so:
else if($(this).scrollTop() <= pos.top && menu.hasClass('fixed')){
 // code here
}
If the result of our statement is true, we want the menu to fade out again, remove the .fixed class and give it a class of .default this time, and then we want it to fade back in, so it’s visible to us:
menu.fadeOut('fast', function(){
 $(this).removeClass('fixed').addClass('default').fadeIn('fast');
});
The script is complete now, this is how it should look:
$(function(){

 var menu = $('#menu'),
  pos = menu.offset();

  $(window).scroll(function(){
   if($(this).scrollTop() > pos.top+menu.height() && menu.hasClass('default')){
    menu.fadeOut('fast', function(){
     $(this).removeClass('default').addClass('fixed').fadeIn('fast');
    });
   } else if($(this).scrollTop() <= pos.top && menu.hasClass('fixed')){
    menu.fadeOut('fast', function(){
     $(this).removeClass('fixed').addClass('default').fadeIn('fast');
    });
   }
  });

});
Well done!
You might also like
Tags
accordion accordion menu animation navigation animation navigation menu carousel checkbox inputs css3 css3 menu css3 navigation date picker dialog drag drop drop down menu drop down navigation menu elastic navigation form form validation gallery glide navigation horizontal navigation menu hover effect image gallery image hover image lightbox image scroller image slideshow multi-level navigation menus rating select dependent select list slide image slider menu stylish form table tabs text effect text scroller tooltips tree menu vertical navigation menu

 Subscribe
 Follow Us


