 Subscribe
 Follow Us
jquery slick Horizontal page tabs animation
 13 years ago
 14065
14065 2143
2143
Horizontal page animation with easing using jquery. A very simple and basic tutorial on how to animate content horizontaly using just a few lines of javascript.
Start by loading the jquery library by inserting:
<script src="http://ajax.googleapis.com/ajax/libs/jquery/1.4/jquery.min.js" type="text/javascript"></script>
between the head tag of your document. This code loads the jquery library straight from Google and we do this for caching purposes.
We also need to insert the jquery plugin that does the easing part:
<script src="jquery.easing.1.3.js" type="text/javascript"></script>
Next we need to create the actual function that does the trick of animating our document. We’ll insert this script at the very end of our markup, just before the closing body tag:
<script>
function Animate2id(id,ease){ //the id to animate, the easing type
 var animSpeed=2000; //set animation speed
 var $container=$("#container"); //define the container to move
 if(ease){ //check if ease variable is set
  var easeType=ease;
 } else {
     var easeType="easeOutQuart"; //set default easing type
 }
 //do the animation
    $container.stop().animate({"left": -($(id).position().left)}, animSpeed, easeType);
}
</script>
This function gets the target id (id) and easing type (ease), checks for webkit browsers (that do not support html animation) and animates the container with a nice easing effect. Inside the function we can set the animation speed (var animSpeed), the default easing type and the container to animate (var $container).
In order to use the function we can call it from a text link like this:
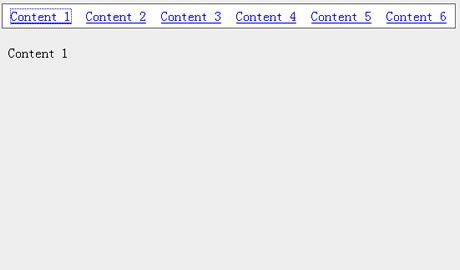
<a href="#" onclick="Animate2id('#c1','easeInOutExpo'); return false">Content 1</a>
Inside the function call we set the id to animate to (‘#c1′) and the easing type (‘easeInOutExpo’). If we don’t set an easing type, the default one will be used which is defined inside the main function. We use return false in order to prevent the default browser action when clicking an anchor.
The css (inside head tag or link):
html,body{margin:0px; padding:0px; height:100%;}
body{overflow:hidden; position:relative;}
#menu{position:fixed; z-index: 2; top:10px; left:10px; clear:both; border:1px solid #666; padding:5px; background:#fff;}
#menu a{margin-left:5px; margin-right:5px;}
#container{position:relative; left:0; width:10000px; top:0; height:100%;}
#c1,#c2,#c3,#c4,#c5,#c6 {width:1500px; height:100%; float:left; margin-right:100px;}
#c1,#c3,#c5 {background:#eee;}
#c2,#c4,#c6 {background:#fff;}
.content{padding:60px 20px;}
And finally our html code:
<div id="menu">
<a href="#" onClick="Animate2id('#c1'); return false" title="Go to 1st content with the default easing">Content 1</a>
<a href="#" onClick="Animate2id('#c2','easeInOutExpo'); return false" title="Go to 2nd content. Easing type: easeInOutExpo">Content 2</a>
<a href="#" onClick="Animate2id('#c3','easeOutQuint'); return false" title="Go to 3rd content. Easing type: easeOutQuint">Content 3</a>
<a href="#" onClick="Animate2id('#c4','easeOutElastic'); return false" title="Go to 4th content. Easing type: easeOutElastic">Content 4</a>
<a href="#" onClick="Animate2id('#c5','easeOutBack'); return false" title="Go to 5th content. Easing type: easeOutBack">Content 5</a>
<a href="#" onClick="Animate2id('#c6','easeOutBounce'); return false" title="Go to 6th content. Easing type: easeOutBounce">Content 6</a>
</div>
<div id="container">
<div id="c1">
 <div class="content">Content 1</div>
</div>
<div id="c2">
 <div class="content">Content 2</div>
</div>
<div id="c3">
 <div class="content">Content 3</div>
</div>
<div id="c4">
 <div class="content">Content 4</div>
</div>
<div id="c5">
 <div class="content">Content 5</div>
</div>
<div id="c6">
 <div class="content">Content 6</div>
</div>
</div>
That’s about it! Have fun
You might also like

Tags
accordion accordion menu animation navigation animation navigation menu carousel checkbox inputs css3 css3 menu css3 navigation date picker dialog drag drop drop down menu drop down navigation menu elastic navigation form form validation gallery glide navigation horizontal navigation menu hover effect image gallery image hover image lightbox image scroller image slideshow multi-level navigation menus rating select dependent select list slide image slider menu stylish form table tabs text effect text scroller tooltips tree menu vertical navigation menu