Making a Mosaic Slideshow With jQuery & CSS

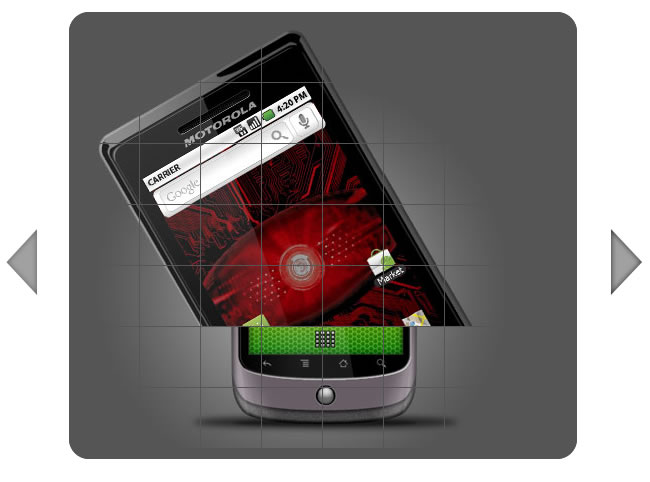
We are making a jQuery & CSS mosaic gallery. Mosaic, because it will feature an interesting tile transition effect when moving from one slide to another.
Step 1 – XHTML
The mosaic effect of the slideshow is achieved by dividing the original image into smaller parts. These tiles, which contain parts of the image, are sequentially hidden from view, which causes the effect. The markup of the slideshow is pretty straightforward. It consists of the main slideshow container element (#mosaic-slideshow), a left and right arrow for previous and next transition and the mosaic-slide div, which is inserted by jQuery at run-time.
demo.html
<div id="mosaic-slideshow">
 <div class="arrow left"></div>
 <div class="arrow right"></div>

 <div class="mosaic-slide" style="z-index: 10;">

  <!-- The mosaic-slide div and the tiles are generated by jQuery -->
  <div class="tile" style="..."></div>
  <div class="tile" style="..."></div>
  <div class="tile" style="..."></div>
  <div class="tile" style="..."></div>

 </div>
</div>
The div with the mosaic-slide class name is added to the page by jQuery after the transition() JavaScript function is executed (we will come back to this in the third step). Inside it you can see the tile divs. There are a total of 56 such divs, each of which has a 60px by 60px portion of the slide image set as its background.

Step 2 – CSS
To make this effect work (and most importantly look good), we have to add a few lines of CSS. Only the code directly used by the gallery is shown here. You can see the code that styles the rest of the demonstration page in styles.css.
styles.css – Part 1
#mosaic-slideshow{
 /* The slideshow container div */
 height:500px;
 margin:0 auto;
 position:relative;
 width:670px;
}

.mosaic-slide{
 /* This class is shared between all the slides */
 left:80px;
 position:absolute;
 top:25px;

 border:10px solid #555;

 /* CSS3 rounded corners */
 -moz-border-radius:20px;
 -webkit-border-radius:20px;
 border-radius:20px;
}

.tile{
 /* The individual tiles */
 height:60px;
 width:60px;
 float:left;
 border:1px solid #555;
 border-width:0 1px 1px 0;
 background-color:#555;
}
The slideshow is contained inside the div with an ID of mosaic-slideshow (or #mosaic-slideshow, if we refer to it in a form of a CSS / jQuery selector). There can be only one such div in the page, hence the use of an ID attribute.
However there can be more than one mosaic-slide divs in the page. The effect itself is achieved by stacking two slides on top of each other and hiding the tiles of the first one to reveal the ones of the second. This is why we are using a class name instead of an ID.
Some of the more interesting rules presented here are the three CSS3 rules for rounded corners. As the CSS3 standard is still a work in progress, browsers don’t support the regular border-radius property yet (except for the new 10.50 version of Opera), and need vendor-specific prefixes to recognize it. The -moz- prefix is used by Firefox, and -webkit- is used by Safari and Chrome.
styles.css – Part 2
.arrow{
 /* The prev/next arrows */
 width:35px;
 height:70px;
 background:url("img/arrows.png") no-repeat;
 position:absolute;
 cursor:pointer;
 top:50%;
 margin-top:-35px;
}

.arrow.left{
 left:15px;
 background-position:center top;
}

.arrow.left:hover{
 background-position:center -70px;
}

.arrow.right{
 right:15px;
 background-position:center -140px;
}

.arrow.right:hover{
 background-position:center -210px;
}

.clear{
 /* This class clears the floats */
 clear:both;
}
The arrow class is shared by the previous and next arrows. They do need individual styling in addition to this common rule, so we add it after this. We are also using a CSS sprite as the background for the arrow divs. It contains a regular and hover state for both arrows, which spares us from having to use four individual images.

Step 3 – jQuery
After including the jQuery library to the page, we can move on to creating the script that will make the slideshow tick. To achieve the mosaic effect, the script defines 4 functions:
- transition() – this function makes an animated transition between the currently shown slide, and a new one specified by the id parameter. It works by positioning the new slide we want to show, below the current one, and then hiding the current one one tile at a time;
- generateGrid() – this function is used by transition() to generate a grid of tiles. Each tile contains a part of the slide image as its background;
- next() – detects which the next slide is and runs the transition() function with its index;
- prev() – analogous to next().
script.js – Part 1
/* The slide images are contained in the slides array. */
var slides = new Array('img/slide_1.jpg',
        'img/slide_2.jpg',
        'img/slide_3.jpg',
        'img/slide_4.jpg',
        'img/slide_5.jpg');

$(document).ready(function(){
 /* This code is executed after the DOM has been completely loaded */

 $('.arrow.left').click(function(){
  prev();

  /* Clearing the autoadvance if we click one of the arrows */
  clearInterval(auto);
 });

 $('.arrow.right').click(function(){
  next();
  clearInterval(auto);
 });

 /* Preloading all the slide images: */

 for(var i=0;i<slides.length;i++)
 {
  (new Image()).src=slides[i];
 }

 /* Showing the first one on page load: */
 transition(1);

 /* Setting auto-advance every 10 seconds */

 var auto;

 auto=setInterval(function(){
  next();
 },10*1000);
});
The $(document).ready() method is executed once the page has finished loading. This will ensure that all the divs and other elements are accessible to the script. Inside it we bind a function for the click event on the previous and next arrows, preload all the images, show the first slide (otherwise the slideshow would be empty) and set up the auto-advance interval.
script.js – Part 2
var current = {};
function transition(id)
{
 /* This function shows the slide specified by the id. */

 if(!slides[id-1]) return false;

 if(current.id)
 {
  /* If the slide we want to show is currently shown: */
  if(current.id == id) return false;

  /* Moving the current slide layer to the top: */
  current.layer.css('z-index',10);

  /* Removing all other slide layers that are positioned below */
  $('.mosaic-slide').not(current.layer).remove();
 }

 /* Creating a new slide and filling it with generateGrid: */
 var newLayer = $('<div class="mosaic-slide">').html(generateGrid({rows:7,cols:8,image:slides[id-1]}));

 /* Moving it behind the current slide: */
 newLayer.css('z-index',1);

 $('#mosaic-slideshow').append(newLayer);

 if(current.layer)
 {
  /* Hiding each tile of the current slide, exposing the new slide: */
  $('.tile',current.layer).each(function(i){
   var tile = $(this);
   setTimeout(function(){
    tile.css('visibility','hidden');
   },i*10);
  })
 }

 /* Adding the current id and newLayer element to the current object: */
 current.id = id;
 current.layer = newLayer;
}
The transition function uses the global current object to store the id of the currently shown slide, and a reference to the current slide div. This is later used to remove leftover slides and prevent a transition from occurring if the same slide as the currently active one is to be shown.
Notice how we use the each method on line 31 to loop through the tiles of the current slide and schedule them to be hidden in i*10 milliseconds in the future. As i is incremented for every tile, this mean that they are hidden 10 milliseconds apart from one another.
script.js – Part 3
function next()
{
 if(current.id)
 {
  transition(current.id%slides.length+1);
 }
}

function prev()
{
 if(current.id)
 {
  transition((current.id+(slides.length-2))%slides.length+1);
 }

}

/* Width and height of the tiles in pixels: */
var tabwidth=60, tabheight=60;

function generateGrid(param)
{
 /* This function generates the tile grid, with each tile containing a part of the slide image */

 /* Creating an empty jQuery object: */
 var elem = $([]),tmp;

 for(var i=0;i<param.rows;i++)
 {
  for(var j=0;j<param.cols;j++)
  {
   tmp = $('<div>', {
     "class":"tile",
     "css":{
      "background":'#555 url('+param.image+') no-repeat '+(-j*tabwidth)+'px '+(-i*tabheight)+'px'
     }
   });

   /* Adding the tile to the jQuery object: */
   elem = elem.add(tmp);
  }

  /* Adding a clearing element at the end of each line. This will clearly divide the divs into rows: */
  elem = elem.add('<div class="clear"></div>');
 }

 return elem;
}
The parameter passed to generateGrid() is an object containing the rows and the columns we want to be generated, as well as the image to be set as the background of the tiles. While generating the tiles, the background image is offset according to the current position of the tile in the row and in the column. Finally the tile is added to an empty jQuery object which is returned at the end.
With this the mosaic slideshow is complete!
You might also like
Tags
accordion accordion menu animation navigation animation navigation menu carousel checkbox inputs css3 css3 menu css3 navigation date picker dialog drag drop drop down menu drop down navigation menu elastic navigation form form validation gallery glide navigation horizontal navigation menu hover effect image gallery image hover image lightbox image scroller image slideshow multi-level navigation menus rating select dependent select list slide image slider menu stylish form table tabs text effect text scroller tooltips tree menu vertical navigation menu

 Subscribe
 Follow Us
 14 years ago
 21478
21478 3031
3031


