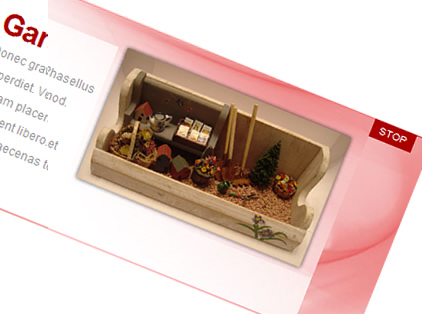
Animated slideshow banner with jQuery(Start/Stop Slider)
 14 years ago
  27838
27838  4783
4783
 n/a
n/a

It’s not a plugin, so it’s not as easy as it possibly could be, but it’s much easier. There is a section at the end for customizing. The slider does feature a stop/start button and the animation goes a little farther than simply sliding to the left =).
The HTML Markup
The markup is extremely light. Simply a wrap that contains the area and hides overflow, then a “mover” inside it to which does the sliding, then slides inside of that.
Notice there is no markup for a stop button. That doesn’t belong in the markup because without JavaScript it would be useless. We’ll apply that through the JavaScript. Also notice the first slide has a unique ID. We’ll use that as our “test slide” to gather width information with the JavaScript.
<div id="slider">

 <div id="mover">

  <div id="slide-1" class="slide">

   <h1>Garden Rack</h1>

   <p>Donec gravida posuere arcu. Nulla facilisi. Phasellus imperdiet. Vestibulum at metus. Integer euismod. Nullam placerat rhoncus sapien. Ut euismod. Praesent libero. Morbi pellentesque libero sit amet ante. Maecenas tellus.</p>

   <a href="#"><img src="images/slide-1-image.png" alt="learn more" /></a>

  </div>

  ... additional slides follow format of this one, except no need for ID ...

 </div>

</div>
The CSS
#slider          { background: white url(../images/slider-bg.jpg); height: 227px; overflow: hidden;
                   position: relative; margin: 50px 0; }
#mover           { width: 2880px; position: relative; }
.slide           { padding: 40px 30px; width: 900px; float: left; position: relative; }
.slide h1        { font-family: Helvetica, Sans-Serif; font-size: 30px; letter-spacing: -1px;
                   color: #ac0000; }
.slide p         { color: #999; font-size: 12px; line-height: 22px; width: 300px; }
.slide img       { position: absolute; top: 20px; left: 400px; }
#slider-stopper  { position: absolute; top: 1px; right: 20px; background: #ac0000; color: white;
                   padding: 3px 8px; font-size: 10px; text-transform: uppercase; z-index: 1000; }
Not much to talk about here, much of this is merely presentational choices. Functionally, the relative position on the #mover is important, and necessary for the sliding affect. Likewise is the absolute positioning on the img elements. With this CSS in effect, but JavaScript off, the slider will show the first slide and that’s it (ideal, if you ask me).
The jQuery JavaScript
90% of what we are doing here is specific to jQuery. Makes things much easier. We’ll need to make sure that library is loaded before the rest of our script.
<script type="text/javascript" src="js/jquery-1.2.6.pack.js"></script>
<script type="text/javascript" src="js/startstop-slider.js"></script>
At the top of our startstop-slider.js file, is a single self-explanitory variable
// SET THIS VARIABLE FOR DELAY, 1000 = 1 SECOND
var delayLength = 4000;
Then we’ll begin our manipulation, after the DOM is ready of course. The first thing we’ll do is append the Stop/Start button to the slider. CSS is already in place to position and style it.
$(function(){

 $("#slider").append('<a href="#" id="slider-stopper">Stop</a>');

});
Next we need to get a little smart and start figuring out what we are dealing with. The number of slides and their widths are vital pieces of information for our slider. Rather than hard-code them in, we’ll use jQuery to count them and determine their width. Counting is easy, width is a little more complicated as we need to pull three CSS values (width, paddingLeft, paddingRight) parse them, and add them together.
var $slide1 = $("#slide-1");

var panelWidth = $slide1.css("width");
var panelPaddingLeft = $slide1.css("paddingLeft");
var panelPaddingRight = $slide1.css("paddingRight");

panelWidth = parseFloat(panelWidth, 10);
panelPaddingLeft = parseFloat(panelPaddingLeft, 10);
panelPaddingRight = parseFloat(panelPaddingRight, 10);

panelWidth = panelWidth + panelPaddingLeft + panelPaddingRight;

var numPanels = $(".slide").length;
var tooFar = -(panelWidth * numPanels);
Now we need to write code to handle the sliding action. There are two places we will potentially want to kick off the animation. One is right when the page is loaded, and the other is when the “Start” button is pressed. Because of these two different places, it makes sense to wrap our animation in a function and call it as necessary (DRY: Don’t Repeat Yourself).
function doMove(panelWidth, tooFar) {
 var leftValue = $("#mover").css("left");

 // Fix for IE
 if (leftValue == "auto") { leftValue = 0; };

 var movement = parseFloat(leftValue, 10) - panelWidth;

 if (movement == tooFar) {
  $(".slide img").animate({
   "top": -200
  }, function() {
   $("#mover").animate({
    "left": 0
   }, function() {
    $(".slide img").animate({
     "top": 20
    });
   });
  });
 }
 else {
  $(".slide img").animate({
   "top": -200
  }, function() {
   $("#mover").animate({
    "left": movement
   }, function() {
    $(".slide img").animate({
     "top": 20
    });
   });
  });
 }
}
In plain English: Check and see where the slider is. If it’s at the last panel, move back to the first panel. Otherwise, move ahead one panel length. Notice all the nesting of the .animate() functions. The animate function has a callback event, which gets run when the animation is complete. So in order to have our animations run one-after-another (instead of all-at-once), we use the callbacks. So now it animates the image up, the mover over, and then the image back down, in that order.
Note that we pass in the width and “tooFar” variables, as the function needs though and they are not global variables. Also there is a little fix for IE that Eric Wendelin fixed for me, where the left value gets bizarrely set back to “auto” instead of “0″.
The “Auto Play”
JavaScript provides the perfect built-in function for an “auto-playing” widget like ours: SetInterval(); We’ll use it to call our function:
sliderIntervalID = setInterval(function(){
 doMove(panelWidth, tooFar);
}, delayLength);
The “sliderIntervalID” variable isn’t required, but that allows us to later call clearInterval() with that ID in order to stop it. Vital for our desired functionality.
All that is left now, is to code the stopping and starting with our little button:
$("#slider-stopper").click(function(){
 if ($(this).text() == "Stop") {
  clearInterval(sliderIntervalID);
   $(this).text("Start");
 }
 else {
  sliderIntervalID = setInterval(function(){
   doMove(panelWidth, tooFar);
  }, delayLength);
   $(this).text("Stop");
 }
});
The button starts out saying “Stop”, since we fired off the animation right when the page loads. That makes sense. So when that button is clicked, it checks and sees if that text stays “Stop”, if it does, it stops the Interval that is running and changes the text to “Start”. Magic.
If the button is clicked and it says anthing other than “Stop” (like it does when it says “Start”), the button will fire off the setInterval function again and change the button text back to “Stop”. Simple and beautiful.
How To Customize
To add another panel, add another div inside the #mover:
<div class="slide">
   <h1>Name of Slide</h1>
   ...etc
</div>
That’s it!
You might also like
Tags
accordion accordion menu animation navigation animation navigation menu carousel checkbox inputs css3 css3 menu css3 navigation date picker dialog drag drop drop down menu drop down navigation menu elastic navigation form form validation gallery glide navigation horizontal navigation menu hover effect image gallery image hover image lightbox image scroller image slideshow multi-level navigation menus rating select dependent select list slide image slider menu stylish form table tabs text effect text scroller tooltips tree menu vertical navigation menu

 Subscribe
 Follow Us


