jQuery cool Polaroid Photobar Gallery

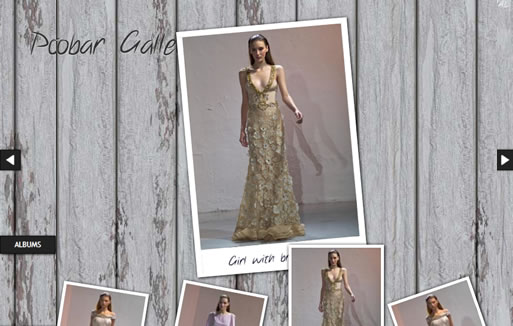
we are going to create an image gallery with a Polaroid look. We will have albums that will expand to sets of slightly rotated thumbnails that pop out on hover. The full image will slide in from the bottom once a thumbnail is clicked. In the full image view the user can navigate through the pictures or simply choose another thumbnail to be displayed.
The Markup
We are going to include all our HTML in a div with the class “pp_gallery”. It will consist of the loading div, the navigation that will appear when the full image is viewed and the main thumbnails container.
Inside of the thumbnails container which will have the class “pp_thumbContainer”, we will have several divs for the albums and a div for going back to the album view. Each album will contain the thumbnails with a description wrapped in a div with the class “content”. We will also include a div element for the description of the album itself.
<div id="pp_gallery" class="pp_gallery">
 <div id="pp_loading" class="pp_loading"></div>
 <div id="pp_next" class="pp_next"></div>
 <div id="pp_prev" class="pp_prev"></div>
 <div id="pp_thumbContainer">
  <div class="album">
   <div class="content">
    <img src="images/album1/thumbs/1.jpg" alt="images/album1/1.jpg" />
    <span>The Sixties by Tetsumo</span>
   </div>
   <div class="content">
    <img src="images/album1/thumbs/2.jpg" alt="images/album1/2.jpg" />
    <span>The Sixties by Tetsumo</span>
   </div>
   ...
   <div class="descr">
    The Sixties
   </div>
  </div>
  <div class="album" style="bottom:-90px;">
   ...
  </div>
  ...
  <div class="pp_back">Albums</div>
 </div>
</div>
The HTML structure of the dynamically created full image preview will be the following:
<div id="pp_preview" class="pp_preview">
 <img src="images/album1/1.jpg" />
 <div class="pp_descr"><span>Description</span></div>
</div>
Now, let’s take a look at the style.
The CSS
We will start with a reset and some general styles for the body:
*{
 margin:0;
 padding:0;
}
body{
 background:#000 url(../bg.jpg) repeat center center;
 font-family:"Myriad Pro", "Trebuchet MS", Helvetica, sans-serif;
 font-size:12px;
 color: #fff;
 overflow:hidden;
}
A structured background fits very nicely, so we choose to add a wood texture. You can find this and more textures on Webtreats.
Next, we will style the loading div and the navigation for stepping through the pictures when we are in the preview mode
.pp_loading{
 display:none;
 position:fixed;
 top:50%;
 left:50%;
 margin:-35px 0px 0px -35px;
 background:#fff url(../icons/loader.gif) no-repeat center center;
 width:70px;
 height:70px;
 z-index:999;
 opacity:0.7;
 -moz-border-radius:10px;
 -webkit-border-radius:10px;
 border-radius:10px;
}
.pp_next, .pp_prev{
 cursor:pointer;
 top:50%;
 margin-top:-16px;
 width:32px;
 height:32px;
 position:fixed;
 text-align:center;
 border:1px solid #111;
 color:#fff;
 -moz-box-shadow:0px 0px 3px #000;
 -webkit-box-shadow:0px 0px 3px #000;
 box-shadow:0px 0px 3px #000;
}
.pp_next{
 right:-40px;
 background:#222 url(../icons/next.png) no-repeat center center;
}
.pp_prev{
 left:-40px;
 background:#222 url(../icons/prev.png) no-repeat center center;
}
The loading div is set to the center of the page by using the 50% negative margin trick. When the position is fixed, we can set the top and left to 50% and add a top and left margin to the negative value of half of the element’s width, or height, respectively.
The same we do for the navigation items, just that here will only center the elements vertically.
The thumbnails container will be positioned at the bottom of the page:
#pp_thumbContainer{
 position:fixed;
 bottom:0px;
 left:0px;
 height:65px;
 width:100%;
}
The albums are hidden initially. When we load the page, they will slide in from the bottom, so we will set the initial bottom value to -90 pixels:
#pp_thumbContainer .album{
 position:absolute;
 width:200px;
 height:65px;
 bottom:-90px;
}
The left value for the positioning of the albums will be calculated dynamically on page load. We will spread all the albums evenly throughout the width of the page.
The description of the album and the back element will share some styles:
.album .descr,
.pp_back{
 position:absolute;
 bottom:0px;
 left:-16px;
 background:#222;
 text-align:center;
 border:1px solid #111;
 padding:5px;
 cursor:pointer;
 width:169px;
 color:#fff;
 cursor:pointer;
 text-shadow:0px 0px 1px #fff;
 -moz-box-shadow:1px 1px 4px #000;
 -webkit-box-shadow:1px 1px 4px #000;
 box-shadow:1px 1px 4px #000;
}
…but not all. We will overwrite and add the values that are specific to the .pp_back class:
.pp_back{
 text-transform:uppercase;
 bottom:120px;
 left:-100px;
 width:80px;
}
The wrapper for the image and the image title will have the following style:
#pp_thumbContainer .content{
 position:absolute;
 top:0px;
 height:155px;
 cursor:pointer;
}
These wrappers will also be spread into position dynamically in our JavaScript. We set the top value to 0, so that all the thumbnails align to the top of the thumbnails container. We don’t want vertical thumbnails to stick out.
The thumbnail will have a white border and a box shadow:
#pp_thumbContainer img{
 border:5px solid #fff;
 -moz-box-shadow:1px 1px 7px #000;
 -webkit-box-shadow:1px 1px 7px #000;
 box-shadow:1px 1px 7px #000;
}
The description for each image is invisible. We will only use it to fill the description element for the full view.
#pp_thumbContainer .content span{
 display:none;
}
The wrapper for the full image will be positioned outside of the page by setting the top value to 150%. Once the image is loaded, we will slide it in from the bottom. We are setting the left value to 50% since we want to center the picture. Since we don’t know the width and height of the picture yet, we cannot set any negative margins yet. We will do that in our JavaScript function.
.pp_preview{
 position:fixed;
 top:150%;
 left:50%;
}
The full image will have a bigger white border at its bottom where we will insert the description:
.pp_preview img{
 position:absolute;
 top:0px;
 left:0px;
 border:10px solid #fff;
 border-bottom:45px solid #fff;
 -moz-box-shadow:1px 1px 7px #000;
 -webkit-box-shadow:1px 1px 7px #000;
 box-shadow:1px 1px 7px #000;
}
The description will be at the bottom of the preview element. In the JavaScript we will set the width and height of the preview div to the one of the image dynamically, so the description will be positioned at the thicker bottom border of the image.
.pp_descr{
 height:45px;
 line-height:45px;
 font-size:20px;
 width:100%;
 bottom:0px;
 left:0px;
 position:absolute;
 text-align:center;
 color:#00021c;
}
We will cufonize the description using a nice hand written font (see at the end).
And now, let’s add some real magic!
The JavaScript
There will be many animations throughout the JavaScript. The albums will slide in from the bottom when the page loads. Once an album is clicked, we will spread the thumbnails evenly by giving them an according left value. When we choose a thumbnail, we need to create the preview div and slide it in from the bottom. The image will get resized so that it fits into the window.
Let’s start by defining some initial variables. First, we want to know if we are dealing with Internet Explorer since we don’t want to use the rotation of the full image here (it’s buggy when used together with the slide in animation):
var ie    = false;
if ($.browser.msie) {
 ie = true;
}
We will use some index variables for the navigation and save some elements:
//current album/image displayed
var current  = -1;
var album  = -1;
//windows width
var w_width  = $(window).width();
//caching
var $albums  = $('#pp_thumbContainer div.album');
var $loader  = $('#pp_loading');
var $next  = $('#pp_next');
var $prev  = $('#pp_prev');
var $images  = $('#pp_thumbContainer div.content img');
var $back  = $('#pp_back');
We want to spread the albums evenly throughout the page, so we will calculate the according left value:
var nmb_albums = $albums.length;
var spaces   = w_width/(nmb_albums+1);
var cnt   = 0;
//preload all the images (thumbs)
var nmb_images = $images.length;
var loaded   = 0;
$images.each(function(i){
 var $image = $(this);
 $('<img />').load(function(){
  ++loaded;
  if(loaded == nmb_images){
   //let's spread the albums evenly at the bottom of the page
   $albums.each(function(){
    var $this  = $(this);
    ++cnt;
    var left = spaces*cnt - $this.width()/2;
    $this.css('left',left+'px');
    $this.stop().animate({'bottom':'0px'},500);
   }).unbind('click').bind('click',spreadPictures);
   //also rotate each picture of an album with a random number of degrees
   $images.each(function(){
    var $this = $(this);
    var r = Math.floor(Math.random()*41)-20;
    $this.transform({'rotate' : r + 'deg'});
   });
  }
 }).attr('src', $image.attr('src'));
});
The spreadPictures function will do a similar thing: it will move the chosen album to the left and spread all the thumbnails:
function spreadPictures(){
 var $album = $(this);
 //track which album is opened
 album = $album.index();
 //hide all the other albums
 $albums.not($album).stop().animate({'bottom':'-90px'},300);
  $album.unbind('click');
  //now move the current album to the left
  //and at the same time spread its images throughout
  //the window, rotating them randomly, hide the description of the album

 //store the current left for the reverse operation
 $album.data('left',$album.css('left'))
    .stop()
    .animate({'left':'0px'},500)
    .find('.descr')
    .stop()
    .animate({'bottom':'-30px'},200);
  var total_pic  = $album.find('.content').length;
  var cnt   = 0;
  //each picture
  $album.find('.content')
     .each(function(){
   var $content = $(this);
   ++cnt;
   //window width
   var w_width  = $(window).width();
   var spaces   = w_width/(total_pic+1);
   var left  = (spaces*cnt) - (140/2);
   var r    = Math.floor(Math.random()*41)-20;
   //var r = Math.floor(Math.random()*81)-40;
  $content.stop().animate({'left':left+'px'},500,function(){
   $(this).unbind('click')
        .bind('click',showImage)
        .unbind('mouseenter')
        .bind('mouseenter',upImage)
        .unbind('mouseleave')
        .bind('mouseleave',downImage);
  }).find('img')
    .stop()
    .animate({'rotate': r+'deg'},300);
  $back.stop().animate({'left':'0px'},300);
   });
}
Now, we will define what happens when we click on the item to go back to the albums view. We will animate the album to its initial left position and slide the other albums up again. If the user was viewing a full image, we will make it slide up, out of the window (hideCurrentPicture):
$back.bind('click',function(){
 $back.stop().animate({'left':'-100px'},300);
 hideNavigation();
 //there's a picture being displayed
 //lets slide the current one up
 if(current != -1){
  hideCurrentPicture();
 }

 var $current_album = $('#pp_thumbContainer div.album:nth-child('+parseInt(album+1)+')');
 $current_album.stop()
      .animate({'left':$current_album.data('left')},500)
      .find('.descr')
      .stop()
      .animate({'bottom':'0px'},500);

 $current_album.unbind('click')
      .bind('click',spreadPictures);

 $current_album.find('.content')
     .each(function(){
    var $content = $(this);
    $content.unbind('mouseenter mouseleave click');
    $content.stop().animate({'left':'0px'},500);
  });

 $albums.not($current_album).stop().animate({'bottom':'0px'},500);
 });
The next function, called showImage, will display the full image by sliding it in from the bottom. If there was another image being shown, we will slide that one up. For centering the preview, we need to set its negative margins according to the width and height of the image. We will also rotate the preview randomly:
function showImage(nav){
 if(nav == 1){
  //reached the first one
  if(current==0){
   return;
  }
  var $content = $('#pp_thumbContainer div.album:nth-child('+parseInt(album+1)+')')
        .find('.content:nth-child('+parseInt(current)+')');
  //reached the last one
  if($content.length==0){
   current-=2;
   return;
  }
 }
 else
 var $content  = $(this);

 //show ajax loading image
 $loader.show();

 //there's a picture being displayed
 //lets slide the current one up
 if(current != -1){
  hideCurrentPicture();
 }

 current     = $content.index();
 var $thumb    = $content.find('img');
 var imgL_source    = $thumb.attr('alt');
 var imgL_description  = $thumb.next().html();
 //preload the large image to show
 $('<img style=""/>').load(function(){
  var $imgL  = $(this);
  //resize the image based on the windows size
  resize($imgL);
  //create an element to include the large image
  //and its description
  var $preview = $('<div />',{
   'id'  : 'pp_preview',
   'className' : 'pp_preview',
   'html'      : '<div class="pp_descr"><span>'+imgL_description+'</span></div>',
   'style'  : 'visibility:hidden;'
 });
  $preview.prepend($imgL);
  $('#pp_gallery').prepend($preview);
  var largeW  = $imgL.width()+20;
  var largeH  = $imgL.height()+10+45;
  //change the properties of the wrapping div
  //to fit the large image sizes
  $preview.css({
   'width'   :largeW+'px',
   'height'  :largeH+'px',
   'marginTop'  :-largeH/2-20+'px',
   'marginLeft' :-largeW/2+'px',
   'visibility' :'visible'
  });
  Cufon.replace('.pp_descr');
  //show navigation
  showNavigation();

  //hide the ajax image loading
  $loader.hide();

  //slide up (also rotating) the large image
  var r    = Math.floor(Math.random()*41)-20;
  if(ie)
   var param = {
    'top':'50%'
   };
  else
   var param = {
    'top':'50%',
    'rotate': r+'deg'
   };
  $preview.stop().animate(param,500);
 }).error(function(){
  //error loading image.
  //Maybe show a message : 'no preview available'
 }).attr('src',imgL_source);
}
The next two functions handle the navigation through the images:
//click next image
$next.bind('click',function(){
 current+=2;
 showImage(1);
});

//click previous image
$prev.bind('click',function(){
 showImage(1);
});
The function hideCurrentPicture will make the preview slide up. We will not use any rotation animation if the browser is IE:
//slides up the current picture
function hideCurrentPicture(){
 current = -1;
 var r  = Math.floor(Math.random()*41)-20;
 if(ie)
  var param = {
   'top':'-100%'
  };
 else
  var param = {
   'top':'-100%',
   'rotate': r+'deg'
  };
 $('#pp_preview').stop()
     .animate(param,500,function(){
      $(this).remove();
     });
}
The showNavigation and hideNavigation functions will take care of showing and hiding the navigation items:
//shows the navigation buttons
function showNavigation(){
 $next.stop().animate({'right':'0px'},100);
 $prev.stop().animate({'left':'0px'},100);
}

//hides the navigation buttons
function hideNavigation(){
 $next.stop().animate({'right':'-40px'},300);
 $prev.stop().animate({'left':'-40px'},300);
}
When hovering over a thumbnail, we want it to move up a little and rotate slightly:
function upImage(){
 var $content  = $(this);
 $content.stop().animate({
  'marginTop'  : '-70px'
 },400).find('img')
    .stop()
    .animate({'rotate': '0deg'},400);
}
When the mouse leaves the currently hovered thumbnail, we want it to drop back, rotating randomly again:
function downImage(){
 var $content  = $(this);
 var r    = Math.floor(Math.random()*41)-20;
 $content.stop().animate({
  'marginTop'  : '0px'
 },400).find('img').stop().animate({'rotate': r + 'deg'},400);
}
And finally, we will use a resize function to fit the full image into the window:
function resize($image){
 var widthMargin  = 50
 var heightMargin  = 200;

 var windowH      = $(window).height()-heightMargin;
 var windowW      = $(window).width()-widthMargin;
 var theImage     = new Image();
 theImage.src     = $image.attr("src");
 var imgwidth     = theImage.width;
 var imgheight    = theImage.height;

 if((imgwidth > windowW)||(imgheight > windowH)){
  if(imgwidth > imgheight){
   var newwidth = windowW;
   var ratio = imgwidth / windowW;
   var newheight = imgheight / ratio;
   theImage.height = newheight;
   theImage.width= newwidth;
   if(newheight>windowH){
    var newnewheight = windowH;
    var newratio = newheight/windowH;
    var newnewwidth =newwidth/newratio;
    theImage.width = newnewwidth;
    theImage.height= newnewheight;
   }
  }
  else{
   var newheight = windowH;
   var ratio = imgheight / windowH;
   var newwidth = imgwidth / ratio;
   theImage.height = newheight;
   theImage.width= newwidth;
   if(newwidth>windowW){
    var newnewwidth = windowW;
    var newratio = newwidth/windowW;
    var newnewheight =newheight/newratio;
    theImage.height = newnewheight;
    theImage.width= newnewwidth;
   }
  }
 }
 $image.css({'width':theImage.width+'px','height':theImage.height+'px'});
}
Since we cufonize the description, we need to add the following lines to the head of the HTML:
<script src="js/cufon-yui.js" type="text/javascript"></script>
<script src="js/Note_this_400.font.js" type="text/javascript"></script>
And that’s it!
You might also like
Tags
accordion accordion menu animation navigation animation navigation menu carousel checkbox inputs css3 css3 menu css3 navigation date picker dialog drag drop drop down menu drop down navigation menu elastic navigation form form validation gallery glide navigation horizontal navigation menu hover effect image gallery image hover image lightbox image scroller image slideshow multi-level navigation menus rating select dependent select list slide image slider menu stylish form table tabs text effect text scroller tooltips tree menu vertical navigation menu

 Subscribe
 Follow Us
 14 years ago
 14941
14941 2468
2468


