Advanced jQuery background images slideshow

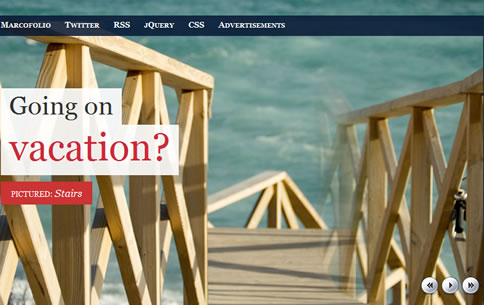
With the use of transparent PNG's, some HTML, pretty nifty CSS and jQuery, we can make this technique work. Read the rest of this article to learn how to create a beautiful advanced jQuery background image slideshow.
It features changing text and playback controls. When the animation doesn't seem smooth, the images might not be loaded. This script can perfectly be combined with an image preloading plugin to get rid of this effect. Tested and works on Firefox, Safari, Chrome and Opera. I've used images with a width of 1500px, just to cover most of the currently used screen resolutions.
Now that we truly know what we need to create, we can start coding!
HTML
First things first: I'm normally not a big fan of empty HTML elements which only purpuse is to be a handle for JavaScript. I'd rather let JavaScript dynamically create the element, just to keep the HTML clean (for SEO purposes for example). But in this example, I'm aiming at how to create this instead of what the best way is to create it.
Having said that, this is the HTML I came up with. Take note I left some parts out, but you can find them when downloading the source.
<div id="header">

   <!-- jQuery handles to place the header background images -->
   <div id="headerimgs">
      <div id="headerimg1" class="headerimg"></div>
      <div id="headerimg2" class="headerimg"></div>
   </div>

   <!-- Top navigation on top of the images -->
   <div id="nav-outer">
      <div id="navigation">
         <!-- Stuff in the navigation bar goes here -->
      </div>
   </div>

   <!-- Slideshow controls -->
   <div id="headernav-outer">
      <div id="headernav">
         <div id="back" class="btn"></div>
         <div id="control" class="btn"></div>
         <div id="next" class="btn"></div>
      </div>
   </div>

   <!-- jQuery handles for the text displayed on top of the images -->
   <div id="headertxt">
      <p class="caption">
         <span id="firstline"></span>
         <a href="#" id="secondline"></a>
      </p>
      <p class="pictured">
         Pictured:
         <a href="#" id="pictureduri"></a>
      </p>
   </div>

</div>
As you can see, we already created all the elements we expected to create when looking at the reference image. Take note of headerimg1 and headerimg2 which are the containers for the background images. The headernav contains three buttons that we use to control the slideshow. We also created some different handles for jQuery to easily manipulate the DOM, like firstline and secondline for the text.
This HTML is what we're going to use as the backbone of our webpage. Now on to add some design using CSS!
CSS
Like I said at the beginning of this article: The CSS in this example is pretty nifty. Therefor, I'll break it up in several parts for make some things more clear. Take note I don't sum up all the CSS properties; Just the important ones.
.headerimg { background-position: center top; background-repeat: no-repeat; position:absolute; }
This is actually the key to achieving this effect. Each headerimg has a background image (set by jQuery) which will be positioned on the center on top of the screen. By setting the no-repeat value, we only display it once. The position is set to absolute in order to place both the handles on top of each other.
#nav-outer { height:110px; position:relative; top:24px; background-image:url("../images/headerbg.png"); }
The navigation is set to a fixed height. The position is set to relative, so we can position it using the top property. The background-image is a transparent blue PNG, just for the nice effect it'll have. We could use the RGBA property here instead of the image, but that only works in CSS3 compatible browsers.
#firstline { background-image:url("../images/textbg.png"); float:left; display:block; }
#secondline { background-image:url("../images/textbg.png"); float:left; display:block; clear:both; }
Both the text lines have a transparent background image (white). By setting the display to block, we can use float:left to make them position next to eachother. I know you could better use one generic class to apply to both the elements, but since we already needed the two handles for jQuery in the HTML, I used this instead.
.btn { height:32px; width:32px; float:left; cursor:pointer; }
#back { background-image:url("../images/btn_back.png"); }
#next { background-image:url("../images/btn_next.png"); }
#control { background-image:url("../images/btn_pause.png"); }
The button controls are pretty easy to understand. The generic .btn class provides a width and height and the proper cursor. Each element has a different icon which the user will see to navigate through the images.
That covers most of the important CSS. On to the most interesting part: jQuery.
jQuery
Since we need to load all the images and text dynamically, we need a variable to store all the information. We create an array filled with objects that contains all the information we need like this:
var photos = [ {
      "title" : "Title 1",
      "image" : "SourceImage1.jpg",
      "url" : "http://www.url.1",
      "firstline" : "First line 1",
      "secondline" : "Second line 1"
   }, {
      "title" : "Title 2",
      "image" : "SourceImage2.jpg",
      "url" : "http://www.url.2",
      "firstline" : "First line 2",
      "secondline" : "Second line 2"
   }
   // More pictures if we want
];

var slideshowSpeed = 6000;
The title will be used at the "Pictured" text. The image is the background image we need and the url will be used twice (once at the second line text and once in the "Pictured" text). The firstline and secondline are self-explanatory.
The slideshowSpeed variable is what we use for the speed (in milliseconds) for the slideshow to display images once the autoplayback functionality is active. Now let's first take a look at the button controls.
// Backwards navigation
$("#back").click(function() {
   stopAnimation();
   navigate("back");
});

// Forward navigation
$("#next").click(function() {
   stopAnimation();
   navigate("next");
});

var interval;
$("#control").toggle(function(){
   stopAnimation();
}, function() {
   // Change the background image to "pause"
   $(this).css({ "background-image" : "url(images/btn_pause.png)" });

   // Show the next image
   navigate("next");

   // Start playing the animation
   interval = setInterval(function() {
      navigate("next");
   }, slideshowSpeed);
});
As you might notice, we're calling sevaral functions here that need to be created: stopAnimation() and navigate(direction). We use the setInterval() method from JavaScript to create a loop to change the images. We stop the animation when the user starts using the next and back button (and the pause button ofcourse). Let's take a look at that stopAnimation() function.
var stopAnimation = function() {
   // Change the background image to "play"
   $("#control").css({ "background-image" : "url(images/btn_play.png)" });

   // Clear the interval
   clearInterval(interval);
};
This is a pretty basic function. We clear the interval by calling clearInterval to stop the animation loop. Now, for the more interesting function: navigate(direction).
var activeContainer = 1;
var currentImg = 0;
var animating = false;
var navigate = function(direction) {

   // Check if no animation is running. If it is, prevent the action
   if(animating) {
      return;
   }

   // Check which current image we need to show
   if(direction == "next") {
      currentImg++;
      if(currentImg == photos.length + 1) {
         currentImg = 1;
      }
   } else {
      currentImg--;
      if(currentImg == 0) {
         currentImg = photos.length;
      }
   }

   // Check which container we need to use
   var currentContainer = activeContainer;
   if(activeContainer == 1) {
      activeContainer = 2;
   } else {
      activeContainer = 1;
   }

   showImage(photos[currentImg - 1], currentContainer, activeContainer);

};
This function only checks what stuff to make active (like selecting the correct container and image) and passes is on to the showImage() function. Let's take a look at how that one works.
var currentZindex = -1;
var showImage = function(photoObject, currentContainer, activeContainer) {
    animating = true;

    // Make sure the new container is always on the background
    currentZindex--;

    // Set the background image of the new active container
    $("#headerimg" + activeContainer).css({
        "background-image" : "url(images/" + photoObject.image + ")",
        "display" : "block",
        "z-index" : currentZindex
    });

    // Hide the header text
    $("#headertxt").css({"display" : "none"});

    // Set the new header text
    $("#firstline").html(photoObject.firstline);
    $("#secondline")
        .attr("href", photoObject.url)
        .html(photoObject.secondline);
    $("#pictureduri")
        .attr("href", photoObject.url)
        .html(photoObject.title);

    // Fade out the current container
    // and display the header text when animation is complete
    $("#headerimg" + currentContainer).fadeOut(function() {
        setTimeout(function() {
            $("#headertxt").css({"display" : "block"});
            animating = false;
        }, 500);
    });
};
As you can see, it uses the variables to set everything in the correct way. Placing the correct image on top of the other one, hiding the text, setting the new text and displaying it after the fadeOut is complete. Take note of the animating variable we set, so the user can't navigate when the animation is playing.
And that's about it! This is one way to create a beautiful large background image slideshow.
You might also like
Tags
accordion accordion menu animation navigation animation navigation menu carousel checkbox inputs css3 css3 menu css3 navigation date picker dialog drag drop drop down menu drop down navigation menu elastic navigation form form validation gallery glide navigation horizontal navigation menu hover effect image gallery image hover image lightbox image scroller image slideshow multi-level navigation menus rating select dependent select list slide image slider menu stylish form table tabs text effect text scroller tooltips tree menu vertical navigation menu

 Subscribe
 Follow Us
 14 years ago
 20715
20715 4088
4088


