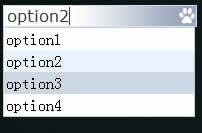
Styling Drop Down Boxes with jQuery

One problem with HTML forms is it is hard to style the elements to fit into your design. The tutorial will show you how to style the hardest of them all, the select box.
The Plan
Unfortunately browsers allow limited skinning of select boxes. So the plan is to use jQuery to change a select box into a text box and a unorded list for the dropdown. When a user clicks on the text box it will display the list below the textbox, just like a regular select box, but it’s easier to style.
Getting Started
The first thing we’ll need is a select box. Nothing special here, just a regular select, but we’re going to give it an id so we can reference it later in the jQuery.
<!DOCTYPE html PUBLIC "-//W3C//DTD XHTML 1.0 Strict//EN"
   "http://www.w3.org/TR/xhtml1/DTD/xhtml1-strict.dtd">
<html>
<head>
    <meta http-equiv="Content-type" content="text/html; charset=utf-8" />
    <title>Styling Select Boxes</title>
</head>
<body>
    <select name="Items" id="Items">
        <option value="option1">option1</option>
        <option value="option2">option2</option>
        <option value="option3">option3</option>
        <option value="option4">option4</option>

    </select>
</body>
</html>
The jQuery
To save a little time we are going to use a plugin to handle converting the select into a text box. From my experience this plugin is far less painful then other ones I’ve tried. It’s as simple as importing the plugin and running a method. Here is the code to get it up and running.
<link rel="stylesheet" type="text/css" href="selectbox.css" />
<script src="http://ajax.googleapis.com/ajax/libs/jquery/1/jquery.min.js" type="text/javascript" charset="utf-8"></script>
<script type="text/javascript" src="jquery.selectbox-0.5.js"></script>

<script type="text/javascript">
$(document).ready(function() {
    $('#Items').selectbox();
});
</script>
Basically we’ve just imported the CSS which styles everything, jQuery, and the plugin. Once we have those then we just have to run the selectbox method on the select boxes we would like to style. We could have done something like $(‘select’) if we wanted to apply it to all select boxes.
The CSS
The CSS in selectbox.css isn’t too difficult, the most important part is applying the background image to the newly created text box. Really you don’t need to touch anything in the CSS and just change the image. In our case we want to make a couple of changes. We’re simply going to change the font size and width inside the selectbox class.
/* Look and feel of select box */
.selectbox
{
  margin: 0px 5px 10px 0px;
  padding-left:2px;
  font-family:Verdana, Geneva, Arial, Helvetica, sans-serif;
  font-size:1em;/* Resize Font*/
  width : 190px; /* Resize Width */
  display : block;
  text-align:left;
  background: url('bg_select.png') right;
  cursor: pointer;
  border:1px solid #D1E4F6;
  color:#333;
}
The full CSS file can be seen here:
/* Drop down styles*/
div.selectbox-wrapper {
  position:absolute;
  width:400px;
  background-color:white;
  border:1px solid #ccc;
  margin:0px;
  margin-top:-10px;
  padding:0px;
  text-align:left;
  max-height:200px;
  overflow:auto;
}

/*Drop down list styles*/
div.selectbox-wrapper ul {
  list-style-type:none;
  margin:0px;
  padding:0px;
}
/* Selected item in dropdown list*/
div.selectbox-wrapper ul li.selected {
  background-color: #EAF2FB;
}

/* Hover state for dropdown list */
div.selectbox-wrapper ul li.current {
  background-color: #CDD8E4;
}

/* Drop down list items style*/
div.selectbox-wrapper ul li {
  list-style-type:none;
  display:block;
  margin:0;
  padding:2px;
  cursor:pointer;
}

/* Look and feel of select box */
.selectbox
{
  margin: 0px 5px 10px 0px;
  padding-left:2px;
  font-family:Verdana, Geneva, Arial, Helvetica, sans-serif;
  font-size:1em;/* Resize Font*/
  width : 190px; /* Resize Width */
  display : block;
  text-align:left;
  background: url('bg_select.png') right;
  cursor: pointer;
  border:1px solid #D1E4F6;
  color:#333;
}
The Image
The last thing we need to handle is creating the image that will be the background for our text box. On the far left of the image is the button and to the left will be the background of the select box. Here is the image we will be using.
![]()
That’s it, after we’ve created the image we’re good to go. I recommend looking at the plugin code to get an idea how it all works.
You might also like
Tags
accordion accordion menu animation navigation animation navigation menu carousel checkbox inputs css3 css3 menu css3 navigation date picker dialog drag drop drop down menu drop down navigation menu elastic navigation form form validation gallery glide navigation horizontal navigation menu hover effect image gallery image hover image lightbox image scroller image slideshow multi-level navigation menus rating select dependent select list slide image slider menu stylish form table tabs text effect text scroller tooltips tree menu vertical navigation menu

 Subscribe
 Follow Us
 14 years ago
 19829
19829 2529
2529


