Simple CSS3 Dropdown Menu
 14 years ago
  8396
8396  1614
1614
 n/a
n/a

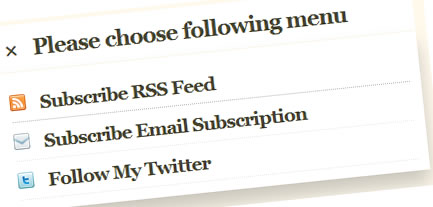
As we know, CSS3 has many good features for help us creating more sweet User Interface. One of them is box shadow, it helps us adding shadow effect on each styled element. You must be familiar with drop down menu with shadow effect on it, People usually add the effect using some images but this example that one using pure CSS.
Drop Down Technique
To create drop down menu like the demo we can use a div for the menu container and an unordered list for the menu. Wrap the unordered list on the div and hide them, we’ll only show the menu when user hovering the div.
As you mention above, the unordered list (the menu) is hidden, positioned inside the div and under the text “Please choose following menu”. So when the user hover the menu container the menu will have sub menu below it.
The Object and Its Style
As I said above the menu container will contains unordered list as the menu, so we will wrap the unordered list with the div :
<div class="drop-menu">
<span class="plus">+</span> Please choose following menu
<ul class="sub-menu">
<li>
<a href="http://feeds.feedburner.com/webstuffsharecom">
<img src="images/rss.png" border="0" alt="rss" /> Subscribe RSS Feed
</a>
</li>
<li>
<a href="http://feedburner.google.com/fb/a/mailverify?uri=webstuffsharecom">
<img src="images/email.png" border="0" alt="email" /> Subscribe Email Subscription
</a>
</li>
<li>
<a href="http://twitter.com/hdytsgt">
<img src="images/twitter.png" border="0" alt="twitter"/> Follow My Twitter
</a>
</li>
</ul>
</div>
The important thing is we must fixed the menu container’s height (class name : drop-menu) so no matter how much list (class name : sub-menu) element inside, its height will not change. We can also make it more cute by set up its padding, font size, border and also the cursor property.
.drop-menu {
 display: block;
 margin-right: auto;
 margin-left: auto;
 text-align: left;
 padding: 10px 10px;
 font-size: 22px;
 height: 25px;
 max-height: 25px;
 width: 400px;
 background: #fff;
 cursor: pointer;
 border: 1px solid #f6f0e4;
}
We need an hover event in the menu container for showing up the menu, we can use CSS pseudo-class :hover. Since we want to show the menu by menu container hover event we can use CSS nesting :
.drop-menu:hover .sub-menu {
 display: inline-block;
}
Next is styling the menu, set its width, background and padding equal to its parent. Add a shadow effect by setting its box-shadow property, set x-axis to 0px, y-axis to 13px, blur to 25px and shadow color to black with 20% alpha. This will make the shadow has a gradient effect.
.sub-menu {
 display: none;
 width: 400px;
 background: #fff;
 padding: 10px 10px;
 margin-left: -11px;
 margin-top: 10px;
 border: 1px solid #fff;
 -webkit-box-shadow: 0px 13px 25px rgba(0,0,0, 0.2);
 -moz-box-shadow: 0px 13px 25px rgba(0,0,0, 0.2);
 box-shadow: 0px 13px 25px rgba(0,0,0, 0.2);
}

 .sub-menu li {
  list-style-type: none;
  display: block;
  border-bottom: 1px dotted #eaeaea;
  font-size: 19px;
  height: 22px;
  padding: 8px 0;
 }

  .sub-menu li img {
   margin-right: .5em;
  }

 .sub-menu li:hover {
  border-bottom: 1px dotted #bababa;
 }
We also will add a little animation to the plus symbol, if the user hovering menu container we will rotate the plus symbol into 45 degree so it will transform into crosswise.
.plus {
 display: inline-block;
 -webkit-transition: .3s ease-in-out;
   -moz-transition: .3s ease-in-out;
   -o-transition: .3s ease-in-out;
}

.drop-menu:hover .plus {
 -webkit-transform: rotate(45deg);
 -moz-transform: rotate(45deg);
 -o-transform: rotate(45deg);
}
Wrap them up :
* {
 margin:0; padding:0;
}

body {
 font-family: Georgia;
 background: #fff9ec;
 text-align: center;
 color: #464530;
 text-shadow: 0px 1px 0px #fff;
 font-size: 30px;
 font-weight: bold;
 letter-spacing: -1px;
 margin-top: 3%;
}

a, a:visited {
 color: #464530;
 text-decoration: none;
}

label {
 font-size: 20px;
}

#content {
 display: block;
 width: 800px;
 margin-right: auto;
 margin-left: auto;
 text-align: center;
}

.drop-menu {
 display: block;
 margin-right: auto;
 margin-left: auto;
 text-align: left;
 padding: 10px 10px;
 font-size: 22px;
 height: 25px;
 max-height: 25px;
 width: 400px;
 background: #fff;
 cursor: pointer;
 border: 1px solid #f6f0e4;
}

 .plus {
  display: inline-block;
  -webkit-transition: .3s ease-in-out;
    -moz-transition: .3s ease-in-out;
    -o-transition: .3s ease-in-out;
 }

 .drop-menu:hover {
  border: 1px solid #fff;
 }

 .drop-menu:hover .sub-menu {
  display: inline-block;
 }

 .drop-menu:hover .plus {
  -webkit-transform: rotate(45deg);
  -moz-transform: rotate(45deg);
  -o-transform: rotate(45deg);
 }

 .sub-menu {
  display: none;
  width: 400px;
  background: #fff;
  padding: 10px 10px;
  margin-left: -11px;
  margin-top: 10px;
  border: 1px solid #fff;
  -webkit-box-shadow: 0px 13px 25px rgba(0,0,0, 0.2);
  -moz-box-shadow: 0px 13px 25px rgba(0,0,0, 0.2);
  box-shadow: 0px 13px 25px rgba(0,0,0, 0.2);
 }

 .sub-menu li {
  list-style-type: none;
  display: block;
  border-bottom: 1px dotted #eaeaea;
  font-size: 19px;
  height: 22px;
  padding: 8px 0;
 }

  .sub-menu li img {
   margin-right: .5em;
  }

 .sub-menu li:hover {
  border-bottom: 1px dotted #bababa;
 }
Conclusion
That’s it, we have made simple drop down menu using pure CSS. By using CSS3 properties we can tune our element into another level and also we can minimize the use of images.
You might also like
Tags
accordion accordion menu animation navigation animation navigation menu carousel checkbox inputs css3 css3 menu css3 navigation date picker dialog drag drop drop down menu drop down navigation menu elastic navigation form form validation gallery glide navigation horizontal navigation menu hover effect image gallery image hover image lightbox image scroller image slideshow multi-level navigation menus rating select dependent select list slide image slider menu stylish form table tabs text effect text scroller tooltips tree menu vertical navigation menu

 Subscribe
 Follow Us


