Super cool Password Strength Meter with jQuery

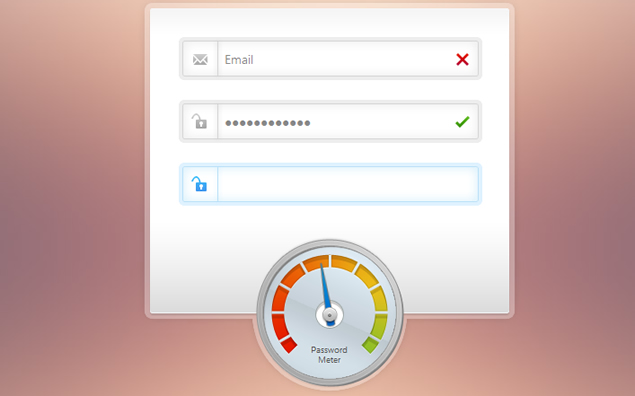
we will be creating a beautiful password strength indicator. It will determine the complexity of a password and move a meter accordingly with the help of the new Complexify jQuery plugin. Only when a sufficiently complex password is entered, will the user be able to continue with their registration.
The HTML
We start off with a standard HTML5 document that will include our registration form. The form will only serve as an example of the password meter – if you need support for actual registrations, you will need to write the required server-side code.
index.html
<!DOCTYPE html>
<html>
    <head>
        <meta charset="utf-8" />
        <title>How to Make a Beautiful Password Strength Indicator</title>

        <!-- The stylesheet -->
        <link rel="stylesheet" href="assets/css/styles.css" />

        <!--[if lt IE 9]>
          <script src="http://html5shiv.googlecode.com/svn/trunk/html5.js"></script>
        <![endif]-->
    </head>

    <body>

        <div id="main">

        	<h1>Sign up, it's FREE!</h1>

        	<form class="" method="post" action="">

        		<div class="row email">
        			<input type="text" id="email" name="email" placeholder="Email" />
        		</div>

        		<div class="row pass">
        			<input type="password" id="password1" name="password1" placeholder="Password" />
        		</div>

        		<div class="row pass">
        			<input type="password" id="password2" name="password2" placeholder="Password (repeat)" disabled="true" />
        		</div>

        		<!-- The rotating arrow -->
        		<div class="arrowCap"></div>
        		<div class="arrow"></div>

        		<p class="meterText">Password Meter</p>

        		<input type="submit" value="Register" />

        	</form>
        </div>

        <!-- JavaScript includes - jQuery, the complexify plugin and our own script.js -->
        <script src="http://code.jquery.com/jquery-1.7.2.min.js"></script>
        <script src="assets/js/jquery.complexify.js"></script>
        <script src="assets/js/script.js"></script>

    </body>
</html>
We are including the latest version of jQuery, the Complexify plugin and our script.js right before the closing body tag for better performance.
jQuery
The jQuery code below is quite straightforward. We are binding a number of events to the form elements and validating them. If an error was encountered, we add an “error” class to the .row div that contains the input. This will display the red cross. The “success” class on the other hand will display a green check mark. When the form is submitted, we check whether all of the rows are marked as successful for allowing the submission.
assets/js/script.js
$(function(){

    // Form items
    var pass1 = $('#password1'),
        pass2 = $('#password2'),
        email = $('#email'),
        form = $('#main form'),
        arrow = $('#main .arrow');

    // Empty the fields on load
    $('#main .row input').val('');

    // Handle form submissions
    form.on('submit',function(e){

        // Is everything entered correctly?
        if($('#main .row.success').length == $('#main .row').length){

            // Yes!
            alert("Thank you for trying out this demo!");
            e.preventDefault(); // Remove this to allow actual submission

        }
        else{

            // No. Prevent form submission
            e.preventDefault();

        }
    });

    // Validate the email field
    email.on('blur',function(){

        // Very simple email validation
        if (!/^\S+@\S+\.\S+$/.test(email.val())){
            email.parent().addClass('error').removeClass('success');
        }
        else{
            email.parent().removeClass('error').addClass('success');
        }

    });

    /* The Complexify code will go here */

    // Validate the second password field
    pass2.on('keydown input',function(){

        // Make sure it equals the first
        if(pass2.val() == pass1.val()){

            pass2.parent()
                    .removeClass('error')
                    .addClass('success');
        }
        else{
            pass2.parent()
                    .removeClass('success')
                    .addClass('error');
        }
    });

});
With this out of the way, we can move on with the Complexify plugin that will validate the password. The plugin takes a callback function with two arguments – a percentage value from 0 to 100 depending on the complexity of the password, and a valid flag that takes into account the minimum length requirement, defined by the minimumChars property.
By tweaking the strengthScaleFactor property you can allow simpler passwords to be used. The default scale is 1 which requires a mix of upper and lower case letters, numbers and special characters, but I found it too strict so I lowered it to 0.7. You can lower it further if you need even simpler passwords.
Read more:http://tutorialzine.com/2012/06/beautiful-password-strength-indicator/
You might also like
Tags
accordion accordion menu animation navigation animation navigation menu carousel checkbox inputs css3 css3 menu css3 navigation date picker dialog drag drop drop down menu drop down navigation menu elastic navigation form form validation gallery glide navigation horizontal navigation menu hover effect image gallery image hover image lightbox image scroller image slideshow multi-level navigation menus rating select dependent select list slide image slider menu stylish form table tabs text effect text scroller tooltips tree menu vertical navigation menu

 Subscribe
 Follow Us
 11 years ago
 12826
12826 4417
4417


