 Subscribe
 Follow Us
jQuery simple Tree Menu
 14 years ago
  44067
44067  6259
6259
 n/a
n/a
This is Custom Events, and the Special Events API in jQuery
Web pages, for the most part, are event-driven. Libraries such as jQuery have provided helper methods to make this functionality much easier to grasp. In this , we’ll look at expanding upon these methods to create your own custom namespaced events.
Events in JavaScript
Before the luxury of JavaScript libraries, if you wanted to add a simple click event to an element you needed to do the follow to support all browsers:
 var elt = document.getElementById("#myBtn");

 if(elt.addEventListener)
 {
  elt.addEventListener("click", function() {
   alert('button clicked');
  });
 }
 else if(elt.attachEvent)
 {
  elt.attachEvent("onclick", function() {
   alert('button clicked');
  });
 }
 else
 {
  elt.onclick = function() {
   alert('button clicked');
  };
 }
Now JavaScript libraries come with helper methods to make event management more digestible. For example, doing the above in jQuery is much more condensed.
 $("#myBtn").click(function() {
  alert('button clicked');
 });
Regardless of your implementation, there are three main parts to events:
- Listener – waits or ‘listens’ for an event to fire.
- Dispatcher – triggers the event to fire.
- Handler – function to be executed when event is fired.
In our click event in the beginning of the tutorial, the listener is the click event waiting for the #myBtn element to be clicked. When the #myBtn element is clicked, it dispatches and will fire the handler; which in this case, is an anonymous function to display the alert() message.
Step 1: Setting up our Page
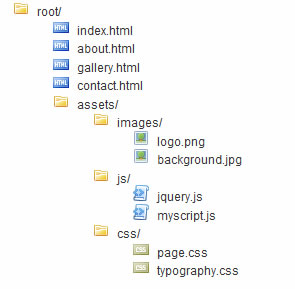
jQuery allows us to go a step further and create our own custom events. In this tutorial, we’ll be using an unordered list of a directory listing and add functionality via custom events that will collapse and expand directories. Let’s start with our basic page structure that will be used in the upcoming examples.
 <!DOCTYPE html PUBLIC "-//W3C//DTD XHTML 1.0 Strict//EN" "http://www.w3.org/TR/xhtml1/DTD/xhtml1-strict.dtd">
 <html xmlns="http://www.w3.org/1999/xhtml" xml:lang="en" lang="en">
 <head>
  <title>jQuery Custom Events</title>
  <meta http-equiv="Content-Type" content="text/html; charset=utf-8" />

  <style type="text/css">
   body   {background: #fefefe; color: #111; font: 12px Arial, Helvetica, sans-serif;}

   #tree  {color: #333; line-height: 14px}
    .directory   {list-style-image: url('images/directory.png');}
    .css    {list-style-image: url('images/css.png');}
    .html   {list-style-image: url('images/html.png');}
    .js   {list-style-image: url('images/js.png');}
    .gif,
    .png,
    .jpg   {list-style-image: url('images/image.png');}
  </style>

 </head>
 <body>
  <ul id="tree">
   <li>root/
    <ul>
     <li>index.html</li>
     <li>about.html</li>
     <li>gallery.html</li>
     <li>contact.html</li>
     <li>assets/
      <ul>
       <li>images/
        <ul>
         <li>logo.png</li>
         <li>background.jpg</li>
        </ul>
       </li>
       <li>js/
        <ul>
         <li>jquery.js</li>
         <li>myscript.js</li>
        </ul>
       </li>
       <li>css/
        <ul>
         <li>page.css</li>
         <li>typography.css</li>
        </ul>
       </li>
      </ul>
     </li>
    </ul>
   </li>
  </ul>

  <script type="text/javascript" src="http://google.com/jsapi"></script>
  <script type="text/javascript">
   google.load("jquery", "1");
   google.setOnLoadCallback(function() {
    $(function() {
     addIcons();

    });
    function addIcons()
    {
     $("#tree li").each(function() {
      if($(this).children("ul").length)
      {
       $(this).addClass("directory");
      }
      else
      {
       var txt = $(this).text();
       var fileType = txt.substr(txt.indexOf(".") + 1);
       $(this).addClass(fileType);
      }
     });
    }
   });
  </script>
 </body>
 </html>
Step 2 – .bind() and .trigger()
Before we start adding events to our directory listing example, we need to have an understanding of how .bind() and .trigger() work. We use bind() to attach an event to all matched elements that currently reside on the page. Then use .trigger() when you want to dispatch the event. Let’s take a look at a quick example.
 $("#myBtn").bind("click", function(evt) {
  alert('button clicked');
 });

 $("#myBtn").trigger("click");
In the code above, when the element with an id of ‘myBtn’ is clicked, an alert message will appear. Additionally, our trigger() will actually fire the click event immediately when the page loads. Just keep in mind that bind() is how you attach an event. While .trigger(), you are forcing the event to be dispatched and execute the event’s handler.
Step 3 – Custom Events using .bind() and .trigger()
The method .bind() isn’t just limited to browser events, but can be used to implement your own custom events. Let’s begin by creating custom events named collapse and expand for our directory listing example.
First, let’s bind a collapse event to all directories represented in our unordered list.
$("#tree li:parent").bind("collapse", function(evt) {
Here we find all elements that are parents and pass the event name collapse into the .bind() method. We’ve also named the first parameter evt, which represents the jQuery Event object.
$(evt.target).children().slideUp().end().addClass("collapsed");
Now we select the target of the event and slide up all of its children. Plus, we had a CSS class collapsed to our directory element.
}).bind("expand", function(evt) {
We are chaining events and attaching our expand event at this line.
 $(evt.target).children().slideDown().end().removeClass("collapsed");
});
Just the opposite of our collapse event handler, in the expand event handler we slide down all the children elements of the directory elements and remove the class collapsed from our target element. Putting it all together.
 $("#tree li:parent").bind("collapse", function(evt) {
  $(evt.target).children().slideUp().end().addClass("collapsed");
 }).bind("expand", function(evt) {
  $(evt.target).children().slideDown().end().removeClass("collapsed");
 });
Just this code alone won’t do anything for us because the events collapse and expand are unknown and have no idea when to be dispatched. So we add our .trigger() method when we want these events to fire.
 $("#tree li:parent").bind("collapse", function(evt) {
  $(evt.target).children().slideUp().end().addClass("collapsed");
 }).bind("expand", function(evt) {
  $(evt.target).children().slideDown().end().removeClass("collapsed");
 })).toggle(function() { // toggle between
  $(this).trigger("collapse");
 }, function() {
  $(this).trigger("expand");
 });
If we run this code, our directories will now toggle when clicked between firing the collapse and expand event. But, if you click a nested directory you’ll notice our events are actually firing multiple times per a click. This is because of event bubbling.
You might also like


Tags
accordion accordion menu animation navigation animation navigation menu carousel checkbox inputs css3 css3 menu css3 navigation date picker dialog drag drop drop down menu drop down navigation menu elastic navigation form form validation gallery glide navigation horizontal navigation menu hover effect image gallery image hover image lightbox image scroller image slideshow multi-level navigation menus rating select dependent select list slide image slider menu stylish form table tabs text effect text scroller tooltips tree menu vertical navigation menu