Beautiful Colorful Sitemap With jQuery

Content-heavy websites with a deep navigational structure can benefit from sitemaps. A sitemap contains links to every important page on a website, often visually organized in a hierarchy. They generally should not have opening and closing mechanisms to display the hierarchy. If you are forcing someone to click five times to drill down to what they are looking for, that is “navigation,” not a sitemap, and isn’t very helpful. Having every link visible at once is ideal for people searching the page for what they are looking for. Admittedly, though, visually browsing a large and deep sitemap can become confusing quickly.
In this demo article, we will build a visually interesting sitemap that makes the hierarchy clearer through the use of color.
Semantic HTML Markup
The perfect HTML structure for a sitemap is the unordered list (<ul>) element. Each list represents one layer of the hierarchy. We can nest lists inside of other lists to build downward and complete the sitemap hierarchy.
We will use a typical university as an example. University websites are often monstrosities of content, with pages ranging from information about the campus and admissions to sports to academic work to alumni foundations. Let’s take a look at some clean unordered-list markup.
<ul>
  <li>
    <a href="#">Visiting Campus</a>
    <ul>
      <li>
        <a href="#">Tours</a>
        <ul>
          <li><a href="#">Undergraduate</a></li>
          <li>
            <a href="#">Walking</a>
            <ul>
              <li><a href="#">Guided</a></li>
              <li><a href="#">Unguided</a></li>
            </ul> <!-- END Walking -->
          </li>
          <li><a href="#">Group</a></li>
          <li><a href="#">Field Trips</a></li>
        </ul> <!-- END Tours -->
      </li>
      <li><a href="#">Campus Map</a></li>
      <li><a href="#">Events Calendar</a></li>
      <li>
        <a href="#">Athletics</a>
        <ul>
          <li><a href="#">Football</a></li>
          <li><a href="#">Baseball</a></li>
          <li><a href="#">Soccer</a></li>
          <li><a href="#">Volleyball</a></li>
        </ul> <!-- END Athletics -->
      </li>
      <li><a href="#">Arts</a></li>
      <li><a href="#">Science</a></li>
      <li><a href="#">Hospital</a></li>
    </ul> <!-- END Visiting Campus -->
  </li>
  <li><a href="#">Admissions</a></li>
  <li><a href="#">Student Life</a></li>
  <li><a href="#">Academics</a></li>
  <li><a href="#">International</a></li>
  <li><a href="#">Research</a></li>
</ul>
This markup, all by itself and completely unstyled, serves as a completely useable sitemap.
Styling with CSS
Some very simple CSS will have this boring ol’ list spiffed up in no time. Indenting each child list, just as the browser does by default, makes good sense for establishing a hierarchy. We’ll keep that idea but house each list in its own box. We’ll shade the background of the boxes in shades of gray, from darkest gray at the “base” of the page (or highest level in the hierarchy) to lightest gray at the “top” (or lowest level in the hierarchy).
ul                { padding: 8px 25px; list-style: none;
                    background: #282828; }
ul ul             { background: #393939; }
ul ul ul          { background: #4b4b4b; }
ul ul ul ul       { background: #5a5a5a; }
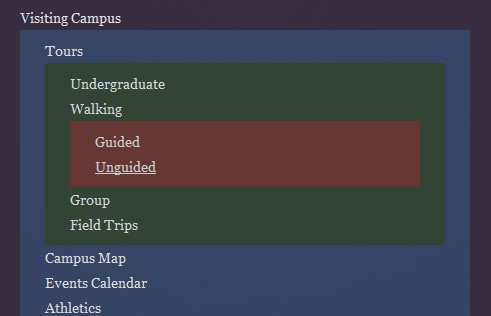
Of course, we have already performed a basic CSS reset, set up some basic typography and applied some background images for extra spiffiness. You can view the complete CSS9 if you want to see it in its entirety. Here is what we have so far:
Bonus CSS for WebKit Browsers
Our effect is starting to look like boxes stacked on boxes. For a bit of progressive enhancement, we can build on this look with the CSS3 box-shadow property. Currently, only WebKit browsers support this feature with a proprietary extension, but it works! To create this effect, add this CSS:
ul { -webkit-box-shadow: 2px 2px 5px black; }
Hey! Why do those inner lists look faded out like that? Don’t worry, that doesn’t have anything to do with the drop shadow. We are going to be working with that in our next step!
Adding the Color Effects with jQuery
We are going to use the jQuery JavaScript library to really make this sample sitemap sing. Remember, the goal is to keep the hierarchy defined through use of color. The idea here is, when the mouse cursor hovers over a list, that list will brighten up a bit and fade to a unique color. When the mouse cursor is removed, the list will return to its original color.
For example, our “outer” list will fade to a purple color when the mouse hovers over it. This is a distinctive effect and allows your eye to follow the purple border and see all the other list items that are a part of that list, despite it being broken up by sub-lists.
We will be animating both the color and opacity of the list. jQuery can animate opacity out of the box, but animating color requires use of the jQuery color plug-in.For the sake of speed, let’s load jQuery from Google, and then link to our own JavaScript file where we’ll be writing our code:
<script src="http://www.google.com/jsapi" type="text/javascript"></script>
<script type="text/javascript">
    google.load("jquery", "1.2.6");
</script>
<script type="text/javascript" src="js/jquery.color.js"></script>
<script type="text/javascript" src="js/sitemap.js"></script>
Now we can dig into our own sitemap.js file. The first order of business is to execute our code only when the DOM is ready for it. Then we will set the opacity level of each of our lists to 50%.
$(function(){

   $("ul").css("opacity", "0.5");

   // Do fading stuff

});
Avoiding Repetitious Code, Building a Plug-In
Each of our lists will get the same “fading” effect, but each will be just slightly different in that it will fade to a different color. To avoid a bunch of unnecessary and unwieldy repetitive code, let’s abstract the fading effect into a simple plug-in we’ll call “doFade.”
Now we can call that plug-in function on each “layer” of the list and pass the color with a parameter.
$(function(){

   $("ul").css("opacity", "0.5");

   $("ul").doFade({ fadeColor: "#362b40" });
   $("ul ul").doFade({ fadeColor: "#354668" });
   $("ul ul ul").doFade({ fadeColor: "#304531" });
   $("ul ul ul ul").doFade({ fadeColor: "#72352d" });

});

Let’s take a look at the entire function and discuss its functionality a bit.

jQuery.fn.doFade = function(settings) {

    // if no paramaters supplied...
   settings = jQuery.extend({
      fadeColor: "black",
      duration: 200,
      fadeOn: 0.95,
      fadeOff: 0.5
   }, settings);

    var duration = settings.duration;
    var fadeOff = settings.fadeOff;
    var fadeOn = settings.fadeOn;
    var fadeColor = settings.fadeColor;

    $(this).hover(function(){
     $(this)
         .stop()
         .data("origColor", $(this).css("background-color"))
         .animate({
             opacity: fadeOn,
             backgroundColor: fadeColor
         }, duration)
   }, function() {
     $(this)
         .stop()
         .animate({
             opacity: fadeOff,
             backgroundColor: $(this).data("origColor")
         }, duration)
   });

};
The function accepts parameters passed to it that it reads as “settings.” The first thing we do is set defaults for those settings, in case the function is called when they are not supplied. This is exactly the case of our code, because we will provide the “fadeColor” but not the duration or fadeOff or fadeOn values.
- fadeColor: the background color that the element will fade to.
- duration: how long the animation takes to complete, 1000 = 1 second.
- fadeOn: opacity percentage when element is hovered on, 0.95 = 95%.
- fadeOff: opacity percentage when element is not hovered on, 0.5 = 50%.
Then we set up the hover function, which binds itself to the element that we called the function on. Hover is actually two functions. The first runs when the mouse hovers over the element, and the second is a callback function when element is no longer being hovered on, essentially a mouseout.
We do three things in the first function. First we .stop(), which ensures any animation being run on the element is stopped. This prevents animations from queuing if the element is hovered on and off quickly, which looks awkward. Then we use jQuery’s brilliant .data() function to store the original color of the element. Remember, each of our lists has its own unique shade of gray; so to avoid hard-coding nonsense, we’ll just auto-detect this color with the .css() function and save it to a variable we’ll call “origColor.” Then we animate both the opacity and the background color to the settings.
In the callback, we’ll again .stop() the animation. Then, all we need to do is animate it back to the original color (which we have stored) and revert to the “off” opacity value.
So there you have it
You might also like
Tags
accordion accordion menu animation navigation animation navigation menu carousel checkbox inputs css3 css3 menu css3 navigation date picker dialog drag drop drop down menu drop down navigation menu elastic navigation form form validation gallery glide navigation horizontal navigation menu hover effect image gallery image hover image lightbox image scroller image slideshow multi-level navigation menus rating select dependent select list slide image slider menu stylish form table tabs text effect text scroller tooltips tree menu vertical navigation menu

 Subscribe
 Follow Us
 14 years ago
 6607
6607 1763
1763


